Monday, August 31, 2009

Sisters


Love the colours of this card - blue and white is always so fresh looking.
I used white cardstock for the cardbase. I then took a layer of blue and white dot scrapbook paper and went around the edges with blue color box ink pad and attached it to the cardfront. I then took my Mediterranean Blue Brilliance ink pad and stamped swirls (Autumn Leaves) and writing and words (Hero Arts) directly onto the cardfront. I then stamped Paperbag studios image of sisters with the same blue ink pad onto white cardstock and then attached it to blue cardstock and then to cardfront. I finished off the card by adding white prima flowers and some bling in the form of rhinestones.

Sunday, August 30, 2009

Photo Stamping
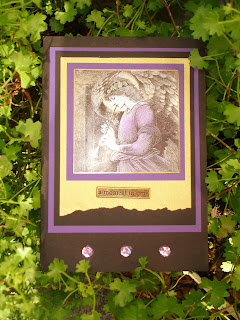


Thought I would share a photo stamped card today. This card uses image from Toybox whose photo stamps are probably the easiest to use of all the photo stamps I have. I stamped the image onto glossy white cardstock using black archival dye ink pad and heat set. ( I use Novatech for my glossy cardstock) I then coloured in areas of the stamp using water brush and watercolor pencils. I then went around the image with gold pen and attached it to purple and then torn edge gold card and then black and then purple cardstock and then to cardfront. I finished it off with a word charm and three rhinestones. This is one of those images that is great for all occasions including Christmas cards.

Saturday, August 29, 2009

Decoupage shoes


Another small card today - two in one week - can't believe it.
For today's card I used Decoupage method for the shoes. Shoes are from a Decoupage sheet on the Glitz and Bitz CD from Carol Ann Studio - fabulous set of CD's if you are into shoes/bags/bodices and it has some lovely backing papers as well.
I used black card for the base and then added a layer of green/blue pattern scrapbook paper after going around the edges with blue color box ink pad and wrapping ribbon with diamante buckle around the bottom first before attaching to cardfront. I then printed out sheet of shoe decoupage and cut out and added layers using foam dots and attached to cardfront.

Friday, August 28, 2009

Friday again - this is what we can all look like tomorrow am


This is definately me in the morning. Just wish I had bunny slippers like hers.
I used white cardstock for the base. I then added a strip of black and white dot paper. I stamped the girl in her pj's image from Rubber Romance using Black Brilliance ink pad onto white cardstock and went around the edges with silver pen and then mounted it onto black cardstock and added a clippola with silver organza ribbon. I then mounted it to the cardfront. I finished off the card by stamping real (Autumn leaves) and adding a couple of square rhinestones.
Have a super weekend everyone.

Thursday, August 27, 2009

Laugh


Today's card uses one of my favourite images from - girl from Paperbag studios. I always order my Paperbag studios stamps from Niki at Paperchain in Johannesburg.
For the base card I used black cardstock. I then took a sheet of orange pattern scrapbook paper and went around the edges with an orange color box ink pad and then attached cream organza ribbon around the bottom section and attached it to cardfront. I then used swirl stamps (Autumn Leaves I think) to stamp swirls onto the cardfront as shown using brown brilliance ink pad. I then stamped the Always True again using same ink pad. I stamped the Laughter girl onto cream cardstock using Brown Brilliance ink pad and coloured using Direct to Paper technique with color box ink pads. I then went around the edges of the girl image with copper pen and then attached to black and then gold cardstock and then to cardfront as shown. I added a couple of butterflies to finish it off together with a flower with a gold brad. The little butterflies always make me think of Hayley.

Wednesday, August 26, 2009

At the seaside
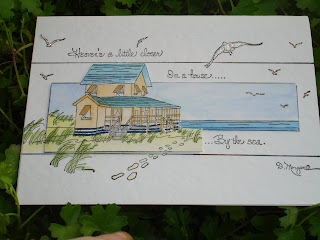

Just for a change - a small card - I rarely make them these days as I normally do 14 x 14 square cards or large cards.
For this card I used white cardstock for the base and then I stamped image directly onto cardfront and then stamped it once again onto white cardstock using black Brilliance ink pad. I coloured in both images (not the house area on the second image) using watercolor paints and waterbrush. I then cut out the second image - just parts of it attached it over the image on the card using foam dots. Then I added some stickles to highlight a couple of areas of the image including the seagulls.
This card makes me think of lazy summer days.

Tuesday, August 25, 2009

Cuttlebug Butterfly


Well as you can see the weekend was bright and sunny in Cape Town so managed to get some pictures taken outdoors.
For this card I used cream cardstock for the base card. I then added layer of green pattern scrapbook to the cardfront after going around the edges first with Amber color box ink pad. I then added a strip of brown and white dot paper and a strip of Penny Black writing scrapbook paper. I used punch to punch out 3 flowers from these papers and attached as shown using foam dots and added a rhinestone. I used my Big Shot with Cuttlebug butterfly die and embossing folder to die cut and emboss butterfly on beige cardstock and then rubbed over the embossed area with a light brown color box ink pad. I then used my Big Shot to cut a Circle Sissix die from Pink Petticoat downloaded green pattern paper and went around edges with amber color box ink pad and attached to cardfront as shown. I then used Stampin up punch to punch out scalloped circle from Penny Black Music paper and again went around edges with amber color box ink pad and attached to cardfront as shown. I then attached the butterfly die cut and a flower. I stamped words using brown brilliance ink pad in lower left hand corner.

Monday, August 24, 2009

The Wardrobe


I thought I would share another card with you that I made from a Papercraft CD - its from one of the Crafters Companion CD's.
The outside of the card looks like a plain wooden wardrobe - sorry I should have taken a photo of it and then when you open the doors to the wardrobe - see image - isn't it fun and so simple to do.
You need to print out the wardrobe itself from the CD and assemble the doors - I used Tim Holtz brass fastners for the door handles. You then print out dresses/shoes/hats etc from the CD and cut them out and decoupage them into the wardrobe using foam pads.
It is one of those cards that looks so much nicer in real life - everyone I have shown it to so far as wanted one. Just such a girl thing.

Sunday, August 23, 2009

Papercraft CD's


Ok so this week I have chatted about Digital downloads and also downloads from the computer ie backing papers and the dotty dresses images. I thought to finish off on this subject, that today I would talk about some of the fabulous Papercrafting CD's available. There are several companies that offer wonderful CD's choc full of paper/images/decoupage/photographs etc that you can use in your cardmaking projects. Some of my favourite companies are
Obviously costs for printing out backing sheets/images is going to vary depending on what type of printer you use and your cartridge costs. I use an HP printer and I have worked out the cost to be approx R3.00 per color page. This doesn't include wear and tear on the machine itself of course. Some images can be printed using normal mode and for photographs I prefer printing on HP everyday photo paper at the best setting on the printer which does use more ink but you get fabulous realistic photos.
Another advantage to using CD's is that you can have lots and they are fairly easy to store - I probably have a 100 piled up on my desk and I use them a lot. I store them in clear DVD plastic covers and I print out my favourite sheet of backing paper from the CD and use that as a cover and then I label it on the side of the DVD with my Dymo. I always just seem to find the right paper on them that I am looking for and what I like as well is that you can easily colour match between patterns ie yesterdays card used 3 different patterns of turquoise paper from Pink Petticoat and the colours all match perfectly. I normally print backing paper on normal setting on my printer and just use plain photocopy paper so at around R3.00 per sheet it is a little bit cheaper than using scrapbook paper.
Today's card uses an image from a Joanna Sheen Baby CD. She is just so adorable I thought. I used white cardstock for my base and then took pink patterned scrapbook paper and went around the edges with a pink color box ink pad. I then took pink and white dot ribbon and attached it around the paper and then attached it all to the cardfront. I printed out Little angel image from the CD onto HP everyday photo paper and then went around the edges with silver pen and attached it to the cardfront. I then added some flowers with a jewel brad and a "girls" cardboard sticker.

Saturday, August 22, 2009

Digital image cards - Girlfriends


Ok so I knew there was another good point to mention about Digital stamps - some of them come in black/white and in color. That way if you are not confident of your colouring in abilities you can use the pre coloured image or alternatively you can use the coloured image as a guide to how to color your own image.
Some more companies to look at for digital stamps include
www.allthatscraps.com - they have the gorgeous CC Designs range of stamps - they are just adorable - you will see on website they will email you a freebie to try out
www.daisiecompany.com - they have freebies you can try out
There are many many more companies as well out there - just do a search on google for digital stamps. Some others include Hero arts and River City Rubberworks.Digi stamping is a fast growing industry.
Today's card again uses an image from http://www.charmedcardsandcrafts.co.uk/ from their Girl about town range. The backing papers are also a download from http://www.pinkpetticoat.co.uk
I used black cardstock for my base card. I then printed out 3 different colour co-ordinating papers from my computer and cut them into strips and went around the edges with turquoise color box ink pad and attached them to cardfront. I then stamped the word Girlfriends in black brilliance down the side of the card. I printed out image from my computer and coloured it in using tombow pens and highlighted areas of image with Stickles glitter glue and went around the edge with turquoise color box ink pad and then attached it to cardfront. I added some bling in the form of turquoise rhinestones and some flowers with a jewel brad.

Friday, August 21, 2009

Digital Stamps from Charmed cards and Crafts

Well today I thought I would show you a card made with a Digital Stamp. What I didn't mention yesterday as an advantage of Digital stamps - the big factor is the Cost. Digital stamps are normally cheaper than UM or mounted stamps as well. Could life get any better......

Today's card uses an image from Charmed cards and Crafts www.charmedcardsandcrafts.co.uk and it is from the Girl about Town range - you get about 53 images for 6 pounds. That's what I call real value for money and the best bit is you can resize the images to whatever size suits your project.

I used black cardstock for the base card. I then used pink shopping queen scrapbook paper and went around the edges with pink color box ink pad and then attached to cardfront. I then attached strip of Pink cardstock as shown. I printed out girl image from computer onto whtie cardstock and went around the edges with pink color box ink pad and then coloured in the image using Tombow pens and attached it to cardfront. I then stamped "Time to Shop" (MFT image) into the bottom corner of the card and added some Prima Flowers.

Thursday, August 20, 2009

Polka Dot Dresses


Today's card features Polka dot dresses. They together with the paper was a download. Downloads are great and so easy - you just print them out and cut them out and make up your card and there is such a huge variety of sites out there offering downloads.
Now these days what I think is also fabulous are Digital Stamps. There are more and more companies offering Digital Stamps these days. What is a digital stamp you ask yourself - its a downloadable image that you buy and download onto your computer. When you want to use it on a card, you just locate the image on your computer, resize if necessary and print it out. You then have image to color in etc and use on your card. Now just think of the possibilities - with digital stamps you can usually resize them so if you are making a Moo card you can make the image tiny or if you are making A4 card you can make the image bigger - fabulous idea I think. Of course the best thing is no storage worries - after all you can store thousands of images on your computer and they don't take up much space. Some companies that offer digital stamps include
Now on to today's card.
I used black cardstock for the cardbase. I then printed out backing swirl/dot paper and went around edges with pink colour box ink pad and then attached to cardfront. I then printed out Dresses and cut them out and went around edges with Color box ink pad and attached them to the cardfront using foam dots. I then ran strip of black cardstock through my Big shot using Cuttlebug embossing folder and attached it to cardfront as shown and added a metal word charm - Passion for Fashion and some Prima flowers with a jewel brad and rhinestones. I also then punched a couple of small daisies with a punch and added them with a rhinestone to the waist of the dresses.
More tomorrow about digital stamping.

Wednesday, August 19, 2009

Moments


Wow what a lot of rain we had in Cape Town yesterday - just about needed a boat to get around instead of a car. Still musn't complain as we havn't had much rain this winter.

Well today is a really quick card and note photographed for a change instead of scanned. Sorry about the shadows but still working on photography skills but difficult when you are taking photos late at night.

Todays card using Hero arts word stamp by Children stamp by Stampington.

I used cream cardstock for the base and then took red pattern scrapbook paper and went around the edge with red color box ink pad and attached to cardfront. I then stamped Moments onto it using Black Brilliance ink pad. I then stamped children onto gold vellum using Black Brilliance ink pad and attached to cardfront using vellum tape and then attached flowers with brad.

Tuesday, August 18, 2009

Flower Fairies


One of my favourite books as a child was The Flower Fairy's. I had a set of 4 different books that I still have today. I have always loved the images of the different fairies and I was thrilled when I heard earlier this year that Crafters Companion was releasing 6 sets of stamps using flower fairy images and also a matching CD with backing papers and decoupage - needless to say I counted the hours from ordering to delivery. I really must compliment Crafters Companion - they offer some really beautiful CD's that are easy to use and jam packed full of decoupage images and background papers and even ATC backers. Even better your order arrives really quickly - I have placed an order before on a Tuesday and received it in my office on Thursday am - not bad from UK to Cape Town....
I have used cream as the base card and then I printed out sheet of flower fairy paper and went around edges with pink colour box ink pad and attached to cardfront. I then took a strip of Pink Bazzil cardstock and stamped words from Crafters Companion onto it using Brown Brilliance ink pad. (sorry scanned badly - says Every little girl wants to be a fairy - definately true in my case) I then attached it as shown. I printed out Rose Flower Fairy decoupage sheet and cut it out and decoupaged fairy using foam pads and attached to cardfront as shown. I then added some flowers which I went over with distress stickles ala Tim Holtz and added some rhinestones.

Monday, August 17, 2009

Happy Monday


Now doesn't this image just make you go- ooh cute.
She's from a company called HAnglar and StAnglar - they have such cute images.
I have used white for the base card. I then took a strip of Pink Bazzil cardstock and ran it through my Big Shot using a Sissix embossing plate and then went around the edges with pink color box ink pad. I then took strip of Pink Petticoat pink pattern paper and some brown and pink dot paper and lined them up and then wrapped ribbon around and secured to cardfront as shown.
I stamped the image using Black Brilliance and then coloured her in using Copic Markers and then cut her out and used Stickles glitter glue to highlight areas of image. I then cut out a label from pink Bazzil cardstock using Spellbinders Nestabilities labels die with my Big Shot and went around the edges with pink color box ink pad and attached to cardfront and then attached girl image on top. I then just added prima flowers and rhinestones.

Sunday, August 16, 2009

Beautiful Butterflies


Today's card features butterflies. I am noticing a mass of caterpillars in our garden at the moment and I am praying that they are all getting ready to turn into beautiful butterflies that will flit around the garden. They are so pretty when they do that - I could sit and watch them for ages - it always make me feel happy when I see them.
If they don't turn into gorgeous butterflies I am going to be really upset as I hate seeing all the furry little things on my plants and must say that I have never seen as many as there are this year.
Today's card uses a cream card base and then I have taken scrapbook paper and gone around the edges with mauve colorbox ink pad and then attached to cardfront. I used stickles clear glitter on various areas of the scrapbook paper to highlight images. I then added the word beauty using alphabet stickers. I then printed out butterflies from Elusive Images CD onto acetate and cut them out and bent their little bodies to give them movement and attached to cardfront. A very simple card but I think very pretty and effective.
Enjoy the rest of your weekend and I hope the caterpillars in your gardens turn into beautiful butterflies for you to enjoy this spectacle of nature.

Saturday, August 15, 2009

Its Saturday and time to put your dancing shoes on


Now today's image didn't scan that well - sorry. Am working on the photography and hope to post soon using photos instead.
This card uses ballerina image from Debbi Moore Designs which is an English company. They sell clear unmounted sheets and also some red rubber unmounted sheets.
The base card is white cardstock and then onto that I have layered Ballet scrapbook paper after going around the edges with a pink colorbox ink pad. Before I glued the scrapbook paper down I wrapped pink netting around it and tied in a bow.
I then stamped the ballet dancer image onto white cardstock using Black Brilliance ink pad and then trimmed to size and went around the edges with Silver pen and coloured in image using copic markers and used some Stickles clear glitter glue to highlight areas of image. I then attached image to cardfront and attached flowers with rhinestone.
Hope you are all enjoying your Saturday.

Friday, August 14, 2009

Oops


Now wasn't that very clever of me - posting today's post on Wednesday - for those of you that spotted it and wandered if I was going mad - the answer probably is yes.

Have now corrected the problem but thought I would post extra card today.

This card uses a Bline stamp image of Hollywood starlet. You can order Bline images from Niki at Paperchain in Johannesburg and you can get them unmounted which saves on storage space which is fab.

The base card is white and I layered strip of black on it and stamped swirl stamp (sorry not sure which company) on it using silver ink. I then stamped up the girl image with black brilliance ink pad and trimmed to size and went around the edges with silver pen and matted it onto black and then silver cardstock and finally to cardfront. I then stamped the word Girlfriends in Black Brilliance on the right hand side of the card.

Now I really can say have a good weekend everyone.

Wow Friday again - Easter idea


Wow can't believe another week has sped by. Thanks to everyone that has left comments on my blog and or emailed me. It really is appreciated.
I will be having some lovely blog candy soon so keep watching.
Today's card uses an image from Stamping Bella - isn't she so cute. Now I know it's an Easter card and its rather early to be planning Easter Cards but she is just so cute couldn't resist posting her now.The background paper is a free download from Epson website.
I have used cream cardstock for the base . I then printed out the pink princess paper from the computer and went around the edges with pink color box ink pad and then attached to cardfront. I then took a strip of lime green cardstock and embossed it with the Cuttlebug Swirls folder using my Big Shot and attached as shown. I stamped the Chi Chi Fairy using black brilliance ink pad on cream cardstock and trimmed to size and coloured in with Tombow pens and glitter. I then went around the edges of image with pink color box ink pad and attached to cardfront. I stamped the Easter Greetings using Orchid Brilliance ink pad and then added the flowers with some bling rhinestones in the centres.
Wishing everyone a wonderful weekend.

Thursday, August 13, 2009

Mother and Child


Well its almost time to start thinking of Christmas cards. One has to start early as overseas posting dates are always jolly early. I also generally join RSA Christmas swap and this year we must make 20 or 21 cards. Nothing nicer than having your mantelpiece filled with cards at Christmas.
Here's a Christmas design that I did a few years back and it remains one of my favourite's. Love the colours - Black/White and Silver.
The stamp of Mother and Child is by Toybox and the snowflake stamps and words are by Hero arts.
I started with a black base card. I then stamped snowflakes randomly on front of card stock and embossed with white embossing powder. I then added strip of black and silver scroll paper to card front. I then stamped my image of mother and child with Memories Black dye ink onto glossy cardstock and trimmed it leaving a white border so that it looks like a photo. I then mounted it onto black cardstock and went around the edges with a silver pen and then mounted it to cardfront after tucking skeleton leaves in two corners. I then stamped wording onto vellum using black brilliance ink pad and mounted it to cardfront using vellum tape and then added Silver music note and some silver butterflies.

Wednesday, August 12, 2009

Shop till you Drop
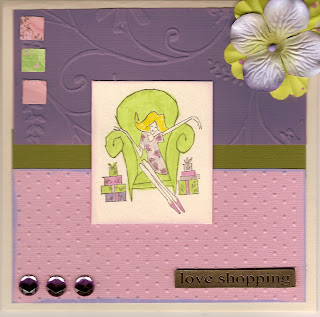


This card just screams Shop till you drop - my favourite pastime. I must say though I am a very focused shopper - I never wander aimlessly around a mall. I have plan in my head of which shops I want to go to and go in and shop and come out. My mother reckons I have special shopping vision, which means that I can walk past a shop and scan it and tell you exactly whats inside without even going in.
For today's card I have used an image from The Angel Company. They operate in a similar way to Stampin Up in the USA - ie party plan basis.
I stamped the image onto cream cardstock and then coloured it with tombow and copic pens. I then went around the edges with a color box ink pad. I used cream cardstock for my base card and then took piece of Pink bazzil cardstock and ran it through my Big Shot using Cuttlebug dots embossing folder and then took a piece of Mauve bazzil cardstock and ran that through using a floral Cuttlebug embossing folder. I then went around edges with mauve colour box ink pad and attached both to cardfront as shown. I then added strip of green bazzil cardstock. I then mounted my stamped image and added word charm and rhinestones. I then used a square punch to punch out 3 small squares from scrapbook paper and added them in top left hand corner and finally added my prima flowers.
Shop till u drop - its really excellent therapy.

Tuesday, August 11, 2009

Exercise - not my favourite thing


I am one of those people that have over the years signed up for several gym contracts and then just never gone - sound familiar. One starts off with the best intentions and then I just never get there. Coach potatoe more my style of exercise. However I must say that fortunately I find shopping gives my arms a good workout - carrying all those heavy shopping bags and all walking in the malls keeps my leg and bum in shape. Well that's my story and I am sticking to it.
I have always wanted to give yoga a go though - looks so serene somehow.
Todays card uses an image from Stamping Bella. I have stamped it on white cardstock with black brilliance and then coloured with tombow pens and went around edges of it with red colour box ink pad. I then took black cardstock for card base, added some red scrapbook paper(went around the edges with a pricking tool so that it looks like I sewed it) to the cardfront and a strip of patterned scrapbook paper and then added my coloured image. Then I added word charm, flowers with rhinestone brad and some gold buttons.

Monday, August 10, 2009

Celebrating Woman's Day


Happy Woman's Day everyone. I should have said that yesterday and posted this but with today being a Public Holiday one tends to think today is Woman's Day as well.
This card uses an image from B Line. Again I get the stamps from my friend Niki at Paperchain in Johannesburg. They are definately one of my favourite companies and have some stunning images and best of all they are unmounted so easy to store.
I used white cardstock for the base card. I then stamped the Corset collage twice on white cardstock and embossed with silver embossing powder. I then cut out just the corset of the second image and coloured it in with silver pencil and then mounted it onto the first complete image using mounting foam tape. I then went around the edges of the image with silver pen and mounted it onto black cardstock and then attached a clippola with some white organza sparkle ribbon and attached it to the card front. I went over certain areas of the image with Stickles glitter glue to highlight areas. I then added strip of braid flowers - they are so pretty - I got them from Delta Trim in Cape Town - I hope they have some more next time I go as I have nearly run out. I then added just a couple of clear rhinestones to finish the card off.
Again my favourite colours - black/white/silver. I do hope that everyone enjoys and makes the most of the rest of this Public Holiday today.

Sunday, August 9, 2009

Sunday's Girl


Hope everyone is enjoying their long weekend. Today I have used an image from Paperbag studios - isn't she just adorable, together with some flourish stamps and Cherish word stamp by Hero Arts.
I used black cardstock for my base card and then I took some striped scrapbook paper and stamped swirls using black brilliance ink pad and then stamped the word Cherish. I then wrapped Pink organza ribbon around and secured the piece to my cardfront. I then stamped the Paperbag studios girl image onto white cardstock using Brown brilliance ink pad and attached it to brown cardstock and then to cardfront. Then I added some buttons and a prima flower and it was done. Paperbag studios really have some gorgeous unmounted stamps and I buy them from my friend Niki at Paperchain in Johannesburg.
Enjoy the rest of your Sunday.

Saturday, August 8, 2009

Card of the day - Dragonfly


I thought I would share this card with you today which was inspired by a Chunky book I did last year.
I used Stampers Anonymous Dragonfly stamp.The base card is Tan Confetti cardstock and then I stamped the Dragonfly once on cream cardstock using black brilliance ink pad and then again on gold cardstock. I trimmed the image on cream cardstock and then took Pritt and ran it around the edges of the image quite thickly and then poured on gold embossing powder and heat set. I then cut out just the wings and the circle from the image on gold cardstock and mounted those on top of the cream stamped image. I then mounted the image onto black and gold cardstock. I then repeatedly stamped the image onto the tan card and added the mounted image, a dragonfly charm and used by Dymo to do the word label. I love the rough effect you get when using Pritt to emboss. It really adds texture.

Friday, August 7, 2009

Cupcake Day


Well it's Friday and nearly the weekend so definately a day to indulge - cupcakes my favourite.

I am hoping to spend some time this weekend trying to Photograph my cards instead of using scans. Jowilna very kindly posted some tips on her website this week so will give it a go and hopefully will then be able to post better images for you.

This is an image from Denami - I love their stuff.
I used black cardstock for the base and then took Green Bazzill cardstock and ran it through my Big Shot using Sissix embossing folder and then attached to cardfront as shown. I then added strips of pink check paper and olive green flower pattern paper. Both of these papers are from Pink Petticoat designs - they offer lovely downloads - paper and images and well worth a look http://www.pinkpetticoat.co.uk/.

I then stamped the image onto White cardstock and went around the edge with a pink color box ink pad and then coloured in using Copic markers. I then stamped What's up Cupcake by MFT directly onto the cardfront and added some rhinestones for bling and some prima flowers with a jewel brad.

Now just wish there was a pile of cupcakes ready next to me to eat.

Thursday, August 6, 2009

Card of the Day - Bridget Jones panties


Now doesn't this card just scream "Big girl panties" a la Bridget Jones. Always have to laugh when I think of that movie.
These two stamps are from Stamps Happen who have long been one of my favourite companies. Their images are really beautiful.
I used a cream cardstock as the base and added a strip of black cardstock black and gold swirl paper. I then stamped the images onto cream cardstock using black Brilliance ink pad and then trimmed to size and went around the edges with a gold pen and mounted onto black and then gold cardstock. I then glittered the bra and panties with black glitter and the M with gold glitter.

Wednesday, August 5, 2009

Card of the day


Today's card is reminscent of Cape Town normally in winter - lots of rain. We sure have been lucky this year though and have had some beautiful days.


The stamp is from My favourite things - I just adore their stamps. Have a look at http://www.mftstamps.com./

I made this card for one of my card classes last month and also sent one to a friend on RSA, Cariena. I don't often use blues but I really like the colours on this one and must really use blue more often.

I stamped the image onto white cardstock and then stamped just the coat area of the stamp again onto patterned cardstock (blue and white dots). I then cut out the coat from the patterned cardstock and glued it onto the image on the white cardstock and there you have the technique - Paper Piecing. I then coloured the boots, trim of coat, dog and puddle with copic markers and highlighted with stickles glitter glue. I went around the edges of the image with a silver pen and then I took white base card, a piece of 14 x 14 scrapbook paper around which I edged with Aqua color box ink pad and then attached it to the cardfront. I then stamped the words using Black Brilliance ink pad, added a strip of Turquoise cardstock and then the image. I then added a couple of Prima Flowers and some rhinestones to finish the card off.

Tuesday, August 4, 2009

Card of the day - Oriental Vision

After looking at my cards posted after the past few days, thought it was time for something plainer with no flowers for a change.


I love this stamp from Stampington - it was originally an Acey Deucy stamp. The Chinese Happy Birthday is I think a Stampendous stamp.


I stamped the Stampington Oriental image onto white cardstock using black brilliance ink and then went around the edge with a silver pen. Mounted it onto black cardstock and then took black base card and mounted a 14 x 14 square of scrapbook paper on it and then mounted stamped image on top. I stamped the Happy birthday words also using my Black Brilliance ink pad and then just added 2 rhinestones. After all a girl needs a little bling on her card at least.


So a really simple card today.

Monday, August 3, 2009

Card of the day - Hat lady


Today's card is using one of my favourite stamps from Buzz and Bloom in Australia. They have a range of girls in hats stamps that are truly gorgeous and they are unmounted so easy to store.


I have been very busy using hat stamps recently for an upcoming Hat and Hat Box Chunky book that I am participating in through the RSA group. Its due mid August and I can't wait to receive my book and see how everyone has interpreted the theme. Benice, the hostess, has already hosted two previous books in what is going to be a quartet - Lingerie book, Shoes and Handbags, Hats and Hat Boxes and the final one will be Dressmakers Mannequins. The first two are truly beautiful.

For this card, I stamped the lady in the hat image onto white cardstock using Black Brilliance ink pad and then trimmed to size and went around the edges with lime color box ink pad. I then coloured in using Radiant Pearls and added some black glitter to the hat band and punched out a small flower. I then mounted it onto black cardstock and then onto Scrapbook paper and finally onto my black card. I tend to use the size 15 x 15 for my base cards a lot. I really just feel comfortable with this size and it tends to suit my style. I then just added a Prima flower and a word charm.

I love hats and wish one had more opportunities to wear them these days.


Sunday, August 2, 2009

Cherry Tilda


Today's card is a birthday card, I made for my friend Helen who celebrated her birthday this month. Isn't the little girl just gorgeous - makes me want to pick her up and eat her. She's Cherry Tilda from the Magnolia range of stamps.

I havn't been into cute stamps since I started stamping but have recently gotten into several cute ranges - Magnolia, Sarah Kay, The Greeting farm and Sugar Nellie. If you havn't come across these ranges before, do have a look - I find the http://www.7kidscollegefund.com/ website great. The new Sarah Kay stamps are just adorable and I can't wait for mine to arrive.

The card has a black cardstock base and then I used a layer of K and Co foiled scrapbook paper. (the bit that appears black above Tilda's head is actually gold foil - sorry it didn't scan very well and I am still perfecting my photography of cards)I stamped Cherry Tilda image onto cream cardstock and then cut her out and coloured her in with Copic markers. I then did the same for the chair she is sitting on. I then used one of my Spellbinders Nestabilities Labels 2 and cut out black label and placed this behind the chair and behind that a strip of Bazzil cardstock that I embossed using a Cuttlebug folder in my big shot. Then I just added some prima flowers with a rhinestone centre and metal word saying Happy Birthday.

Her pigtails just do it for me.

Saturday, August 1, 2009

Card of the day - A road less travelled


Today's card is using black and white - I just love those colours. When I was about 15 I started wearing black clothes all the time and drove my mother mad as she very rarely wears black as she prefers pastel pinks and mauves. She couldn't understand why I would want to drape myself in head to toe Black.


Well 30 years later, I still wear black almost every day and my friends get shocked when I wear another colour. I can't understand personally - what's wrong with having 20 pairs of black trousers, 50 black jerseys and 50 pairs of black shoes. I must add though that in winter I do often add a coloured scarf. Another love I have, is my collection of BLING. A girl just can't live without her bling. I have 5 seperate leather chests of drawers with 4 drawers in each set in my bedroom full of bling - its all very well organized of course with each drawer having 3 trays in it. It's kind of a major decision each morning, what to choose.

This card uses an image from Rubber Romance and the words are from Great Impressions South Africa. If you are wanting to get hold of a Rubber Romance image you can get them from Ronita at Simply Creative who is part of RSA Group. They really are fabulous unmounted stamps - very girly images.

Onto a white base card, I layered black and black and white dot paper on the left hand side. I then stamped the main image using Black Brilliance ink pad onto white cardstock and trimmed to size and went around the edges with a silver pen. I then mounted it onto black cardstock with a silver clippola and added it to the cardfront. I then stamped the words using Black Brilliance again and added a white Prima Flower.

This image also makes me think of my dream car - an Audi TT. They are just so cute. One day....... Got to have a dream in order for a dream to come true. So keep dreaming everyone - its good for the soul as well.