Wednesday, March 31, 2010

Dressmakers Dummies Chunky Book


In January I did a chunky book swap and the theme was Bodice/dressmakers dummy's. This was the one side of my page which I then turned into a DL card.

I used a digi stamp for the shop window and added in the name of the shop - Harrods Creations of course. The Dressmakers dummies are a stamp by B Line Designs and the black/white backing paper is a Pink Petticoat design.

Certainly a very blingy shop but then with a name like that it would have to be .................

Tuesday, March 30, 2010

K L M Atc

I recently participated in the KLM alphabet ATC swap. Its so great seeing all the ideas that everyone comes up with for each letter of the Alphabet. These were my ideas for KLM

K - The King (Elvis)
L - Laugh
M - Marilyn


I love this one of Marilyn

This was done using Paperbag studios stamp and Paint Dabber technique - love the effect you get with the Paint Dabbers.


And who else could be the King but Elvis.

Monday, March 29, 2010

Pressie for you


This is a card I made for another of my card class gals for her birthday this month - Sharon.
Again the die cut circle was cut on my Cricut machine and the image of the little girl is by Hero Arts. I also used a needle tool to prick little holes all around the Mauve Bazzil cardstock layer and the image was coloured with copic pens.
Have a great week everyone - at least it's a short one.

Sunday, March 28, 2010

Highlighting Gail


Today's card was a Birthday card I received a while back from Gail Grant.
Love the colours and the layout - real stunning card.
Enjoy and I hope that everyone else is having a great Sunday lunch - my favourite meal of the week.

Saturday, March 27, 2010

Shopping girl


I made this card for one of my card class gals - Debbie for her birthday this month. She is a shopaholic so I thought this was very appropriate.
The circle die cut was cut on my Cricut machine and the image was coloured with copic markers.
Enjoy the rest of today - I am taking Princess for puppy training classes this afternoon so wish us luck - she definately needs a spot of discipline.

Friday, March 26, 2010

Highlighting Hayley


Today's card is from a friend in Durban, Hayley.
I love what she did with the flower and the saying is so gorgeous.
Enjoy

No posts I'm Fine

Thanks for all the emails and messages. I am fine I have just had a very busy week and thus no posts. Hope to be back to normal early next week.

Have a great weekend everyone

Regards
Amanda

Sunday, March 21, 2010

Highlighting Elaine


Today's card is a card I received a while back from Elaine. Stunning envelope style card decorated front and back.


Saturday, March 20, 2010

Getting ready for a big night out


Today's card uses an adorable image from Cute Daisy May. I just love their digital images.
Materials required: Black cardstock, Pink Bazzil cardstock, Pink pattern scrapbook paper, cream cardstock, copic pens, stickles glitter glue, pink flower, pink organza ribbon, pricking tool, pink color box ink pad, digital image by Cute Daisy May
Method: Fold black cardstock to create 15 x 15 cm square card. Print out digital image onto cream cardstock and color in using copic markers and use stickles glitter glue to highlight areas of image and then go around edges with pink color box ink pad. Use needlework pricking tool to make row of dots around edges of Pink Bazzil cardstock and then go around edges with pink color box ink pad and attach to cardfront. Wrap organza ribbon around scrapbook paper and go around edges with pink color box ink pad and attach to cardfront. Attach image and then attach flower.
She really does look as though she is preparing for a fabulous night out.

Friday, March 19, 2010

Highlighting Sandra Fullerton


A fabulous card today from the very talented Sandra Fullerton and using one of my favourite stamps - My mothers dress by Inkadinkadoo.

Thursday, March 18, 2010

Time for a Picnic


It's time for a Picnic - this is a Sarah Kay image that I downloaded from a colouring in site. You really can find some fabulous images on the internet.

Materials required: Black cardstock, Pink Bazzil cardstock, Cream cardstock, Pink pattern scrapbook paper, Cuttlebug embossing folder, flower, buttons, colouring in book Sarah Kay image, Stickles glitter glue, pink color box ink pad, copic markers

Method: Fold black cardstock to create 15 x 15cm square card. Go around edges of scrapbook paper and Pink Bazzil cardstock with pink color box ink pad and attach to cardfront. Run strip of pink bazzil cardstock through Big Shot using cuttlebug embossing folder and attach to cardfront as shown. Print out image onto cream cardstock and color in using copic markers and highlight areas with stickles glitter glue and then go around edges with pink color box ink pad and attach to cardfront as shown. Attach flowers and buttons.

Wednesday, March 17, 2010

Me and my bird


Today's card uses an image from Sugar Nellie.
Materials required: Cream cardstock, Pink Bazzil cardstock, pattern scrapbook paper, Pink Ribbon, Stamp by Sugar Nellie, Copic pens, Stickles clear glitter glue, Ribbon, Flower, Pink color box ink pad, Black Brilliance ink pad.
Method: Fold cream cardstock to make 15 x 15 cm square card. Go around edges of Pink Bazzil cardstock with pink color box ink pad and attach to cardfront.Go around edges of scrapbook paper with same color box ink pad and then wrap pink ribbon around scrapbook paper and tie in knot as shown and then secure scrapbook paper to cardfront. USe Black brilliance ink pad to stamp image onto cream cardstock and then color in using Copic markers and highlight areas with Stickles clear glitter glue and then go around edges with pink color box ink pad and attach to pink bazzil cardstock and then to cardfront. Attach pink flower.

Tuesday, March 16, 2010

Puppy Shower


Well I had heard of Baby Showers but my card class girls gave me a Puppy shower last month on the day I was due to go and fetch Princess. Debbie had baked biscuits in the shape of dogs bones complete with pink glitter icing and Helen had organized a chocolate brownie cake decorated with little dogs and chocolate words like pooch. I got lots of fabulous presents from everyone for Princess. She was spoilt rotten.
Here are some of the cards that I received - Dog bone shape card from Helen, Woof words from Debbie Luker, Princess word charm and hearts from Joyce and even Tilly in New Zealand sent a gorgeous card with dog and word princess in the frame. I also got some lovely other cards to welcome Princess and of course she had to admire them all the next day .


Monday, March 15, 2010

Cupcakes

These are some fabulous cupcakes that I got for my birthday last year. Thought they were so pretty and they were yummy to eat as well.

My birthday today so no card - I am relaxing instead.


Sunday, March 14, 2010

Highlighting Penny G


A gorgeous card today from Penny Goument in Knysna. Love what she did with this Hero arts stamp and love the seal on the card.

Saturday, March 13, 2010

Out of Africa


Something different for a change - I rarely do the "African" theme.
Materials: Black cardstock, copper cardstock, cream or white cardstock, lumiere copper/gold/dark green paints, domino, black stazon, black brilliance, selection of animal stamps, number stamp, A stamp and swirl stamp, buttons, copper pen
Method: Take your white/cream cardstock and using a sponge sponge on gold and copper lumiere paint. I also added a bit of dark green paint. Once you are happy leave to dry and then use black brilliance ink pad to stamp animals, paw prints, numbers,swirls and letter A. Then mount it onto black and then copper cardstock and then to cardfront as shown. Take your domino and sponge on Lumiere copper paint and allow to dry and then use Staz on to stamp leopard's face onto domino. Go around edges of domino with copper pen and attach to cardfront. Add buttons.

Friday, March 12, 2010

Highlighting Niki Zipp


Here's a beautiful Pear card from my friend Niki Zipp. Love the colors and the background done with alcohol inks.

Thursday, March 11, 2010

What a girl wants


Simple black and white card today - my two favourite colors.
I used black die cut for the mannquin and added a vellum dress. I stamped on the vellum using white brilliance ink pad. I used black cardstock strip to add belt and then a small black flower on the belt and rhinestones for the necklace.
I then used embossing punch to emboss row of flowers down the side of the card and added a dot of glitter in the centres.
I stamped the words using black brilliance directly onto the front of the card.

Wednesday, March 10, 2010

Easter Cross Card


Another idea for Easter. This is a card I made using a scoring board. Card is in the shape of cross and at the back it has a bit on that allows it to stand up. I then also used the scoring board to make the leaves and flowers and added them to the cross with some yellow stickles glitter in the centres.

Tuesday, March 9, 2010

Easter card idea


Another Easter card idea today - how cute is this angel holding her bunny rabbit.

Materials required: Black cardstock, pink pattern scrapbook paper, strip of pink bazzil cardstock, cream cardstock, black brilliance ink pad, stamp, copic markers, stickles glitter glue, sakura glitter pens, flowers, rhinestones, skeleton leaves, pink color box ink pad

Method: Fold black card to make 15 x 15cm square card. Use black brilliance ink pad to stamp image onto cream cardstock and color in using copic pens, stickles glitter glue and sakura glitter pens. Go around edges of image with pink color box ink pad and attach to black cardstock. Go around edges of pink pattern scrapbook paper with pink color box ink pad and attach to cardfront and then add strip of bazzil cardstock and then mounted image. Add flowers and rhinestone and skeleton leaves.

Monday, March 8, 2010

Movie Stars


Today's card is a DL card for a change - Used stamp from Stampington showing various Movie stars.

Materials required: Black cardstock, silver cardstock, white cardstock, clear rhinestones, Film stars stamp by Stampington, background floral stamp by Penny Black, clear embossing ink pad, black brilliance ink pad, silver embossing powder, silver pen

Method: Fold black cardstock to create DL card. Use clear embossing ink pad to stamp floral background repeatedly over front of card and emboss with silver embossing powder. Use Black Brilliance ink pad to stamp image onto white cardstock and then up up into 3 and mount each onto black and then silver cardstock and then onto black cardstock and then silver cardstock and then to cardfront. Add rhinestones.

Sunday, March 7, 2010

Highlighting Debbie


Whoops - I mistakenly credited this card last week to Debbie Harris and it should have been the very talented Debbie Luker. Sorry about that Debbie.

Saturday, March 6, 2010

Beaded easter greetings


Well believe it or not its time to start thinking Easter cards. Scary thought - where does time go to.
Here's an Easter card I made a few years ago which I still like.
Materials required: Black cardstock, gold cardstock, white cardstock, cream organza ribbon, white and gold beads, Background stamp by Penny Black, Easter greetings stamp by Hero arts, Black Brilliane ink pad, Clear embossing ink pad, Gold embossing powder, pop up foam dots, stickles glitter glue, magic red liner tape
Method: Fold black cardstock in half to create base card. Use clear embossing ink pad to stamp floral pattern repeatedly over front of card and emboss using gold embossing powder. Highlight centre of flowers with a dot of stickles clear glitter glue. Cut out 3 egg shapes from white cardstock (i just cut freehand) and then put red liner tape on them and lift off the backing from the tape and pour on beads. Matt layer of white and then black and then gold cardstock and then use pop up foam dots to secure the eggs to this matt and attach to cardfront as shown. Stamp word with black ink pad and matt onto black and then gold cardstock and then to cardfront. Add ribbon.

Friday, March 5, 2010

Highlighting Sheilah


A fabulous Eastern style card today from Sheilah in Durban. Such a striking card and I love how she gilded the kimono.
Thursday, March 4, 2010

Milk cartons


Today I thought I would share with you some of the milk cartons I made for Christmas. I filled them with chocolates and nuts as gifts for a couple of friends. Of course they can be made for any time of the year and not just christmas. Other ideas for filling them - bath salts/soaps/crafty items.
They were fun to make and went quite quickly once you had done the first one. I taught this to my girls at card class in December and I think one of the girls told me she had made about 100.

Wednesday, March 3, 2010

Girl


Well after saying yesterday that MFT (My favourite things) is one of my favourite companies, I thought I had better post a card using one of their images today. This little cutie is from the Innocence range of theirs. They are just so cute I could eat them up.
Materials required: White cardstock, Royal Blue Bazzil cardstock, Blue pattern scrapbook paper, Letter G alphabet sticker, Innocense stamp by MFT, Copic Markers, stickles glitter glue clear, blue color box ink pad, girl gaffer tape, roses, swirl Cuttlebug folder, Black brilliance ink pad
Method: Fold white cardstock to make 15 x 15 cm square card. Attach square of blue bazzil cardstock and then go around edges of pattern scrapbook paper with blue color box ink pad and then wrap Girl gaffer tape around paper and attach to cardfront. Run strip of blue bazzil cardstock through big shot using swirl embossing folder and attach to cardfront. Stamp out image using black brilliance ink pad onto white cardstock and heat set and then color in using Copic pens and highlight with Stickles glitter glue and then go around the edges with blue color box ink pad and attach to blue bazzil cardstock and then to cardfront. Attach sticker and roses.

Tuesday, March 2, 2010

At the seaside


Today's card uses a digital image from Cute Daisy May - love her stuff. Actually I have been having a think recently about my favourite stamp companies and my top 5 at the moment are
1. Cute Daisy May
2. Whiff of Joy
3. Sarah Kay
4. MFT
5. Stampers Anonymous
Wow that was hard narrowing it down to 5. There are so many others that I love as well. Probably the reason why I have so many stamps.
Do take a look at the Cute Daisy May blog on a regular basis as she often has freebies up for grabs. See link below the card instructions.
Materials required: White cardstock, aqua color box ink pad, Copic pens, blue flowers, Ocean breezes metal word charm, Navy blue bazzil cardstock, blue and white dot scrapbook paper, blue pattern scrapbook paper, Royal blue color box ink pad
Method: Fold white cardstock to create 15 x 15cm square card. Attach square of Navy Bazzil cardstock and then go around edges of polka dot paper with a royal blue color box ink pad and attach to cardfront. Attach strip of blue pattern scrapbook paper as shown and then attach word charm and flowers. Print out Cute Daisy May digital image onto white cardstock and then color in using Copic markers and go around edges with Aqua color box ink pad and attach to cardfront.
Have a fabulous day

Monday, March 1, 2010

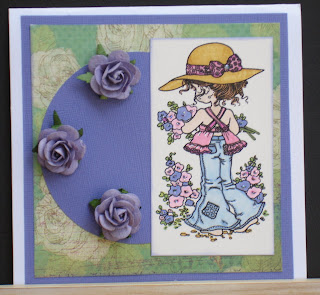
Sarah Kay - In my garden


Today's card uses a Sarah Kay image.
Now you can buy the stamp of this image or what I did was get the image from one of the many colouring in sites offering Sarah Kay images. Saved myself lots of money.
Materials: White cardstock, Mauve bazzil cardstock, Green pattern floral scrapbook paper, mauve roses, copic pens, white ranger gel pen, circle cut on Cricut, mauve color box ink pad
Method: Print out colouring in image onto white cardstock and color in using copic pens and use ranger white gel ink pen to highlight areas. Go around edges with mauve color box ink pad and set aside. Fold white cardstock to create 15 x 15 cm square card . Go around edges of mauve bazzil cardstock and green floral scrapbook paper with mauve color box ink pad and attach to cardfront. Use Cricut to cut a circle from Mauve bazzil cardstock and attach to cardfront as shown. Attach coloured in image and then attach roses.
Wishing everyone a great week and Happy March. Also a big thank you to everyone that leaves comments on my blog or emails me. I really appreciate the comments.