Monday, February 1, 2010
Gilden Glitz Technique on Acetate

Wednesday, January 27, 2010
Serviette technique

Monday, January 25, 2010
Spotlight technique

Tuesday, December 22, 2009
Grid Technique - another sample

Sunday, December 20, 2009
Grid Stamping Technique

Saturday, December 19, 2009
Stamping on CD's

Thursday, December 17, 2009
Stamping on Copper technique

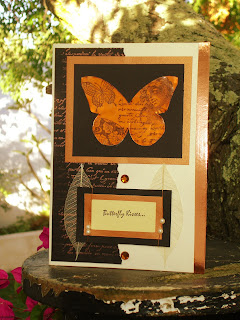
For today's card I have stamped onto copper sheeting. Staz on is brilliant for stamping onto the copper sheeting as the surface of the copper is rather slippery and the staz on dries pretty quickly.
Technique: You can buy copper metal sheeting from most stamp shops. It also comes in gold, silver and sometimes you can find blue/green etc. When stamping onto the metal you need to use something like Staz on ink pad that was designed especially for stamping onto surfaces like metal/ceramics etc. If you make a mistake and don't like your image you can wipe it off and start again - you may need to use a bit of stamp cleaner when you wipe it off. Be careful when cutting out shape from the metal as the edges can be sharp. You will find the Staz on dries in about 5 minutes but you can also heat set it if you want to.
Materials: Cream cardstock, black cardstock , copper cardstock, copper magic ribbon, copper sheet, copper wire, small beads, rhinestones, skeleton leaves, selection of stamps, hero arts writing stamp, Staz on ink pad, black brilliance ink pad, copper encore ink pad
Method: Fold cream cardstock to create base card. Run strip of copper magic ribbon down right hand edge. Take copper encore ink pad and stamp Hero arts words repeatedly and then tear edge and secure to cardfront as shown. Take a butterfly shape out of the copper metal sheet and then use Staz on Black ink pad to stamp several images and allow to dry. Attach to black and then copper cardstock and then to cardfront as shown. Attach rhinestones. Stamp butterfly kisses words onto cream cardstock with Black Brilliance ink pad and wrap copper wire around with small beads on and attach to copper and then black cardstock and then secure skeleton leaves to cardfront and attach stamped word.
Have fun and enjoy stamping on metal - it adds lots of texture to your card and is something a bit different from stamping on paper.
Wednesday, December 16, 2009
Angel on Domino/Stamping on Domino's technique

Tuesday, December 8, 2009
Stamping on Cork

Saturday, December 5, 2009
Stamping on Painted backgrounds

Wednesday, November 25, 2009
Tape Transfer technique
 Today's card demonstrates yet another very easy technique - Tape Transfers.
I always try and get the very wide cellotape for this technique - its about 6cm wide. I find that width is the easiest size as it covers most pictures. This technique will work with either a picture from a glossy magazine ie Fair Lady/Vogue etc or a toner based photocopy. Must be toner based not inkjet ie you can't print something on your HP printer and use that picture - photocopy it first on a toner based photocopier.
Technique Step by Step
1. Select your picture from magazine or your photocopy and trim it so that it roughly fits the width of your tape - doesn't matter if its slightly larger as you can just trim the edges once the tape is on. You then place the cellotape/Sticky tape over the image with the sticky side on the actual image itself.
2. Pour some warm water into the sink and then place your cellotaped image into the water. Leave it for about 30 seconds and then start rubbing the back of the cellotape. I do this under the water and you will see that little balls of paper come off and if you keep rubbing for a couple of minutes eventually you will get rid of all the paper and what is left is your cellotape with the image imprinted on it.
3. If it was a photocopy then the image will be black and white obviously and if the image was from a magazine it will be in full color. I then lay the image onto a towel with the shiny side of the tape down and leave it to dry well. You will then find that the cellotape regains some of its stickness once dry and is probably enough to then stick it onto some plain cardstock ready for mounting on your card.
It's as simple as that and it is really fun to see the results especially with magazine color transfers.
Today's card uses a photocopy image of a woman and child.
Materials: Black cardstock, clear embossing ink pad, silver embossing powder, tape transfer image, white cardstock, silver cord, butterflies, word stamp by Paper Inspirations, corner punch.
Method: Fold black a4 cardstock in half to create base card. Use clear embossing ink pad to stamp words onto cardfront as shown and emboss with silver embossing powder. Take tape transfer picture and attach it to white cardstock and then black cardstock and then white cardstock. Use the corner punch to punch the corners of the white cardstock and then thread silver cord around the white cardstock and attach to cardfront. Attach butterflies.
I hope you enjoyed today's technique and give it a try.
Tuesday, November 24, 2009
Looking back/Gold Paint spray paper technique

Saturday, November 21, 2009
Exploding box technique


Monday, November 16, 2009
Just married/Photo stamping technique

Saturday, November 7, 2009
Shattered Glass technique

Friday, November 6, 2009
Pop out Cards Technique


Friday, October 30, 2009
Alcohol Ink technique - Part 2

Thursday, October 29, 2009
Alcohol Inks and Dominos techniques

Wednesday, October 28, 2009
Credit card technique

Tuesday, October 20, 2009
Christmas card with honeycomb paper


