Thursday, December 31, 2009

Off to a masked Ball


Well if you are off to a masked ball tonight or even just a big party - then have fun and enjoy.

Todays card uses a mask stamp from Judikins.

Materials: Black cardstock,Cream embossed paper, tea stained music paper, feather, pearl ex paints, clear embossing ink pad, gold embossing powder, pearls.

Method: Stamp mask image onto black cardstock using clear embossing ink pad and emboss using gold embossing powder. Color in mask using pearlex paints and allow to dry. Attach strip of cream embossed flower paper to front of black card and then attach torn piece of tea stained music paper and then feather and then finally mask. Attach pearls.

And so I say farewell to 2009 - may 2010 be a better year for everyone.

Wednesday, December 30, 2009

Highlighting Hayley


This card uses my favourite colors - black, white and pink. Its such a gorgeous card and is from my friend Hayley in Durban.
It was a thank you card and is just so stylish and crisp and clean - I love it.
Nearly time to say goodbye to 2009 and welcome in 2010.

Tuesday, December 29, 2009

Dreams


Another photo card today using an image from Stampsmith. I love their photo stamps. See www.stampsmith.net
Materials: Black cardstock, white glossy cardstock, stripe scrapbook paper, photo stamp by Stampsmith, Dreams word stamp by Stampers Anonymous, butterflies, rhinestones, pink wool, Black archival dye ink pad, Black Brilliance ink pad, stickles glitter glue
Method: Use Black dye ink pad to stamp photo image onto white glossy paper and then allow to dry and cut out leaving white trim around the edges just like a normal photo. Mount onto black cardstock. Wrap pink wool around stripe scrapbook paper and then attach to cardfront. Attach photo image. Use Black brilliance ink pad to stamp dreams word and allow to dry and then go over with Stickles glitter glue. Attach butterflies and rhinestones.

Monday, December 28, 2009

Highlighting Benice


This is such a pretty card and the colors are gorgeous - blue and green. Benice even included a tea bag inside the card.
Go on - take time 4 tea and smell the roses.

Sunday, December 27, 2009

Veiled Woman


Todays card uses a photo stamp from Stampland Chicago called Ashwinder Veiled. She looks as though she is full of mystery.
Materials: White cardstock, Black cardstock, White glossy paper, Silver encore ink pad, Black archival die ink pad, rhinestones,organza ribbon, Hero arts word stamp
Method: Use archival dye ink pad to stamp veiled woman image onto white glossy paper and then cut leaving a white border. Attach to black cardstock. Use silver encore ink pad to stamp words onto black card stock repeatedly and then attach to front of white card as shown. Lay organza ribbon behind stamped image as shown and secure to cardfront. Add rhinestones.

Saturday, December 26, 2009

Another Award


Well I hope everyone had a fabulous Christmas Day and that Santa brought lots of lovely pressies to everyone.

I had a fabulous day and got some gorgeous pressies in my stocking. I also got another award. Thanks so much Sarah.

Well very short and sweet today as lots more eating to do and want to finish off my James Patterson novel.

Enjoy Boxing Day

Friday, December 25, 2009

Merry Christmas


Wishing everyone a very Merry Christmas. On Christmas day, My mother and I normally get up fairly early and get our breakfast and then settle down in the lounge with our coffee and open all our presents. I act as Father Christmas handing out the presents to each of us and then we count how many pressies we have to open and then we take it in turns to open one. We normally give each other lots of little presents as well as something bigger, that way it takes several hours to open all the pressies. We then have more coffee and admire all our pressies and cards before having a light lunch and then we have Christmas dinner with all the trimmings in the evening. I am not mad on Turkey so we normally have Roast Beef and Yorkshire puddings which is my favourite, followed by the traditional Christmas pudding with brandy butter complete with charms inside.
This card I am sharing today is a Step Christmas card and I have used cuttlebug die cuts and embossing folders with it. I have made several step cards recently and I think they are different to your normal card and they create a real little scene as it were.
I hope that you all enjoy your day and have a fabulous Christmas and try not to eat too much.....

Thursday, December 24, 2009

Merry Christmas

Well this little elf is very busy today - wrapping up last minute presents , finishing off my mothers christmas card and dealing with a couple of work emergencies so no post today bar to say I Wish everyone a very Merry Christmas and a Happy New Year. Enjoy your Christmas day and try not to overindulge.

Wednesday, December 23, 2009

Highlighting Marilyn


Another brilliant shoe card from my friend and partner in crime Marilyn. Guess my friends know I love shoe cards and I just adore this stamp but unfortunately havn't been able to get hold of it. Maybe I will have to try and whip it away from Marilyn when she isn't looking.

Wow only two more sleeps till pressie time - CHRISTMAS.

Tuesday, December 22, 2009

Blog awards


Wow what an honour - another blog award - this one is from Debbie.

Now I have to answer all these questions

Your cell phone: Samsung

Your hair: Light brown/blonde - highlighted

Your mother: Addicted to computer games

Your favourite food: Roast beef and yorkshire pudding or Thai or Indian

Your dream last night: busy - very busy - I think McDreamy was probably in it

Your favourite drink: Champers of course

Your dream/goal: to continue being happy

What room are you in: Computer room

Your hobbies: Papercrafting, Stamping, Reading, garden

Your fear: Crocodiles and the dentist

Where do you want to be in 6 years: - right here or on my own private island in the middle of nowhere

Where were you last night: home

Muffins: Blueberry or chocolate

Wish list item: A larger craft room

Where did you grow up: Kenya and Cape Town and England

Last thing you did: Sent a pile of emails about work

What are you wearing: Black top/trousers/shoes and Diamond earings

Your TV : Don't have mnet or cable so rely on SABC so not much to watch

Your Pets: None but wanting a puppy

Friends: Wonderful, Inspiring, Amazing

Your life: Busy - never stops

Your modd: Happy - the sun is shining and the butterflies are playing in the garden as I look out the window

Missing someone: My sister

Car: BMW

Something you are not wearing : Bra

Your favourite stores: Any shop especially those with books/bling and rubber stamps and paper

Favourite color: Black

When was the last time you cried: Last nite when I finished my book

Your best friend: My mum

One place that you go to over and over: My craft room

Facebook: Can't get into it

Favourite place to eat: Wangthai

Now to pass this on is always hard - there are so many awesome bloggers out there.

Paola http://paolaspaperhaven.blogspot.com

Cariena http://cariena.blogspot.com

Susan http://sunelscrafts.blogspot.com

Shamela http://stampnscrapwithshamela.blogspot.com

Grid Technique - another sample


Todays card makes use of the Grid technique again as demonstrated the other day. The only difference is that I have used leaf/word stamps and different colors. I also went all over the images with a crackle stamp which blurs the grid lines and I added a stamped wooden domino. I painted the small wooden domino first with lumiere paint and then stamped tree onto it. I also added some gold lumiere paint over the top of everything using a stipple brush which again softens the whole grid effect.

Monday, December 21, 2009

Highlighting Shamela


Now as promised on Friday, herewith Shoe card received from Shamela. Isn't it great and so different from Angella's gorgeous shoe on Friday, yet they were both made with same template - just different color papers and wow.
Have a great week everyone and I hope you are enjoying the cards I am highlighting from friends.

Sunday, December 20, 2009

Grid Stamping Technique


Today's card makes use of the Grid Technique.
Here you can see the grid fairly defined. On Tuesday I will show you same technique used on a card but instead of squaring off the central image I used more of an angle and it changes the whole perspective of the grid.
You can do the grid technique either using glossy paper and dye inks or alternatively using matt paper and I use color box cats eye ink pads. I have used the second option here.
There are several excellent grid stamping technique sites with detailed step by step pictures, so I would urge you to go have a look at how this technique is done.

Saturday, December 19, 2009

Stamping on CD's


I got given a whole box full of old computer CD's a few years ago and had to work out how to use them on a card - being a stamper you can never just throw anything away can you. After experimenting a bit I found this technique worked for me.
Technique: Take Lumiere or Dala Metallic paints and a sponge and sponge paint onto the cd lightly. You don't want to do it too heavily as otherwise it will take ages to dry. If you have done it lightly then it should be dry in about 15 to 30 minutes. I normally paint up a whole lot of cd's at once so that they are ready to stamp onto. You can then stamp using black brilliance or black staz on ink pad and again it will take about 5 to 10 minutes for the ink to dry before you can attach it to your card.
Materials: Cream cardstock, CD, Lumiere or Dala Metallic paint, Black Brilliance or Staz on, Selection of butterfly stamps, Hero arts word stamp, butterfly charm, stipple brush or old fashioned shaving brush works well for stippling, amber and butterscotch dye ink pads, Skeleton leaf
Method: Fold cardstock in half to create square 15 x 15 card. Sponge paint onto CD as described above and then when dry stamp with selection of butterfly/word stamps. Stipple amber and butterscoth onto cardfront using stipple or shaving brush and use same ink pads to stamp butterflies directly onto cardfront. Attach skeleton leaf and then CD and butterfly charm.
Hope you will give stamping on CD's a go.

Friday, December 18, 2009

Highlighting Angella


Now isn't this an adorable card using my favourite subject - shoes. Can a girl ever have too many black shoes........
Angella was inspired by a template that appeared in the Australian Stamping and Papercraft magazine. Funnily enough I got another card using this template from Shamela which I will highlight on Monday just to show you how different they are - both stunning.
Have a lovely weekend everyone.

Thursday, December 17, 2009

Stamping on Copper technique


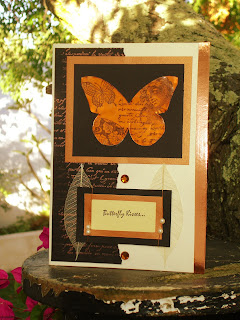
For today's card I have stamped onto copper sheeting. Staz on is brilliant for stamping onto the copper sheeting as the surface of the copper is rather slippery and the staz on dries pretty quickly.

Technique: You can buy copper metal sheeting from most stamp shops. It also comes in gold, silver and sometimes you can find blue/green etc. When stamping onto the metal you need to use something like Staz on ink pad that was designed especially for stamping onto surfaces like metal/ceramics etc. If you make a mistake and don't like your image you can wipe it off and start again - you may need to use a bit of stamp cleaner when you wipe it off. Be careful when cutting out shape from the metal as the edges can be sharp. You will find the Staz on dries in about 5 minutes but you can also heat set it if you want to.

Materials: Cream cardstock, black cardstock , copper cardstock, copper magic ribbon, copper sheet, copper wire, small beads, rhinestones, skeleton leaves, selection of stamps, hero arts writing stamp, Staz on ink pad, black brilliance ink pad, copper encore ink pad

Method: Fold cream cardstock to create base card. Run strip of copper magic ribbon down right hand edge. Take copper encore ink pad and stamp Hero arts words repeatedly and then tear edge and secure to cardfront as shown. Take a butterfly shape out of the copper metal sheet and then use Staz on Black ink pad to stamp several images and allow to dry. Attach to black and then copper cardstock and then to cardfront as shown. Attach rhinestones. Stamp butterfly kisses words onto cream cardstock with Black Brilliance ink pad and wrap copper wire around with small beads on and attach to copper and then black cardstock and then secure skeleton leaves to cardfront and attach stamped word.

Have fun and enjoy stamping on metal - it adds lots of texture to your card and is something a bit different from stamping on paper.

Wednesday, December 16, 2009

Angel on Domino/Stamping on Domino's technique


Today's card uses an image stamped onto a domino. Stamping on domino's is great fun and really easy - it just takes a minute or two extra patience. You can make up fabulous jewellery using the stamped domino images ie image instead of putting this on a card, you could put a pin on the back and use as a brooch - I have one and lots of people comment on it. Another great idea is to get someone with a drill to drill holes in the sides of the dominos and then stamp up several and thread threw jewellery elastic and make up a braclet - it is very striking and unique and bound to draw lots of comments.
Another idea is to use domino on a chain around your neck. So really you can make unique gifts from domino's which cost very little from the Crazy store.
Materials: Black cardstock, copper cardstock, cream cardstock, vellum, domino, gold angel wings. joy word stamp by Hero arts, eyelets, domino, lumiere or dala metallic paints, black brilliance or staz on ink pad, copper beads and wire.
Method: Fold black cardstock to create base card. Attach copper and then black cardstock. Take square of vellum music paper and attach to cream cardstock using four eyelets in the corners and attach to cardfront. Take paint (I used Copper Lumiere) and paint domino by sponging on the paint and leave to dry. Once paint is dry use black brilliance or black staz on to stamp Mischief angel stamp from Stampers Anonymous onto domino. When stamping on domino, if you have painted the domino first it is not that slippery so its easy to stamp onto. I normally ink up my stamp and then place stamp on my desk with inked side facing up and then I take the domino and place it onto the part of the stamp i want and press down firmly and then lift off. Worst case scenario if you don't like the image then you can use thinners to remove the paint and image and start again. If you havn't painted the domino, you can still stamp directly onto the domino but it will be a little bit more slippery so grip it firmly when pressing it on the stamp and lift off. Again if you don't like the image or its not perfect then just use staz on stamp cleaner to remove image and wash the domino and then stamp again. You can then color the image using dye ink pads or sharpie markers. I often use a gold pen to do the sides of the domino. Ok so on with the card. Wrap copper wire and small beads around the domino and then attach angel wings and secure to front of card. I then added two small round stickers.
I hope this inspires you to give stamping on domino's a go. Its great fun and ideal for making up some last minute unique christmas presents and best of all its really cheap if you get the dominos at the Crazy store.

Tuesday, December 15, 2009

Using wire and beads


Today's card uses an image from Stampington. This is one of those cards that you could use for Christmas or any occasion really.
Materials: Cream cardstock, copper cardstock, black cardstock, tea stained music paper, copper magic ribbon, stamp by Stampington, copper wire, beads, pearls, word stamp by Hero arts, Copper Encore ink pad, black brilliance ink pad, color box ink pad - amber, gold ribbon
Method: Fold cream cardstock to create base card. Take strip of black cardstock and using copper encore ink pad stamp Hero arts words repeatedly and then tear edge of cardstock and attach to cardfront as shown. Attach strip of copper magic ribbon to right hand edge of card. Use black brilliance to stamp image of angel onto cream cardstock and color using DTP with amber color box ink pad. Wrap copper wire around image and thread on tiny beads. Attach image to black and then copper cardstock and then to cardfront as shown. Attach pearls and roll up strip of tea stained music paper and tie with gold ribbon and attach to cardfront.

Monday, December 14, 2009

Highlighting Michelle


Thought this was a good way to start the week with a bright and cheerful card from Michelle Anders. Love the shocking pink/black/silver combination and oriental is one of my favourites. Love the flower Michelle made on the card.
Michelle is the head Honcho on RSA group - she started it a few years back. Michelle and I used to share classes at Banbeary Cottage in Somerset West back when I first started stamping.
Enjoy your week everyone.

Sunday, December 13, 2009

Angel


Now you know I just love angels. Today's card uses some gorgeous wide ribbon that I bought years ago in Durban at a shop that Kim took me to.
Materials: Cream cardstock, wide star ribbon, wooden stars, angel stamp, gold paper, gold magic ribbon, clear embossing ink pad, gold embossing powder. word stamp.
Method: Fold cream cardstock to create square 15 x 15 card. Run strip of wide ribbon around card and secure at back. Then take another piece of cream cardstock the same size as the card front and secure this to the inside front cover to hide the back of the ribbon. Place strip of gold magic ribbon on the right hand edge of the card. Use clear embossing ink pad to stamp words into bottom corner of card and emboss with gold embossing powder. On a piece of cream cardstock use clear embossing ink pad to stamp angel and emboss with gold powder and mat onto gold cardstock and then to cardfront. Add wooden stars.

Saturday, December 12, 2009

More awards


Wow I do feel honoured. Got this award from both Jowilna and Cariena this week. I am supposed to tell you 7 things about myself - here goes

1. I am petrified of dentists yet I chose to have all my front teeth capped at 21 and redone last year - real sucker for punishment.

2. When I was younger I was very much a "Don't suffer fools gladly" type of person but fortunately as I have got older I think/hope I have gotten more understanding towards others.

3. I am desperately wanting to find a golden retriever puppy to adopt. She is going to be called Princess and have a bling collar in true Harrod style. She will be loved and spoilt rotten.

4. I am a diabetic and a cancer survivor

5. I am a great believer in you must take time in life to stop and smell the roses in life.

6. I never worry - its a real gift, but I have the ability to ponder something for 5 minutes and then put it right out of my mind. I always say no point in worrying about something because that will not solve the problem. What will be will be is my motto in life.

7. I love bling - all types ie on cards but especially jewellery and I have quite a collection - probably enough to wear a different necklace/ring/watch everyday of the year.......See its not just stamps that I collect. I also make some of my own jewellery.

Well now I am meant to pass this on to 7 other people but I think I have been pipped to the post as most of the others that I want to award this to have already received it. I do though want to pass it on to Desiree. Do visit her blog at http://desireeh1.blogspot.com . She has some fab photos up of sunsets a super girly shoe card this week.

Thanks again to Jowilna and Cariena for the award.

Friday, December 11, 2009

Highlighting Tilly


Today's card is one that I received from my friend Tilly in New Zealand earlier this year. Its a small square card and love the pink and brown color combination. Love also what she did with the ribbons.

Thursday, December 10, 2009

Me and Carrie Lou Dress card


This is such an old card but I still adore this stamp - its by a company called Me and Carrie Lou and they did the most adorable girly stamps but not sure if they are still around.
Materials: Light brown cardstock, black cardstock, music and newspaper tea stained papers, pearlex paints, black embossing powder, clear embossing ink pad, buttons, handbag charm, stamp by Me and Carrie Lou.
Method: Fold brown cardstock to make base card. Add some tea stained music and news papers to cardfront and then use clear embossing ink pad to stamp dress onto black cardstock and then emboss with black embossing powder. Cut out dress and color in with pearl ex paints and attach to cardfront. Add buttons and handbag charm

Wednesday, December 9, 2009

Style - Stamping on vellum


A simple card today but one that I think is simply stylish.....Couldn't help that comment - sorry.
On today's card I have stamped onto vellum. I find the ideal ink pads for stamping on vellum are Brilliance. It dries quickly. Do try taking the white brilliance and stamping onto white/clear vellum - it gives a stunning effect.
Materials: cream cardstock, gold vellum, black cardstock, measurement scrapbook paper, buttons, sticker alphabet, Dress stamp by Impression Obsession, Black Brilliance ink pad.
Method: Fold cream cardstock to make DL card. Use black brilliance ink pad to stamp onto the gold vellum and then mount the dress onto black cardstock. Take a strip of the measurement scrapbook paper and apply it to the cardfront as shown and then attach the stamped image. Attach buttons and alphabet stickers spelling out the word Style.

Tuesday, December 8, 2009

Stamping on Cork


Well the other day I shared a card that made use of stamping on paint, so today I thought I would share a card I did - stamped on cork.
You can buy sheets or rolls of very thin cork from stationary shops and it is so easy to stamp on and is excellent for those African style cards. Also adds some texture to your card.
Materials: Cream cardstock, black cardstock, cork, African stamps - Local SA Manufacturers, Feather, Gold brads, black brilliance ink pad
Method: Fold cream cardstock to make square 15 x 15 card. Take Black Brilliance ink pad and stamp Cheetah and pots onto cork and trim cheetah to size and mount onto cream and then black cardstock and then to cardfront. Cut out pots and attach to cardfront and stamp word Africa directly onto cardfront. add feather and gold brads.

Monday, December 7, 2009

Highlighting Gail


Now this remains one of my favourite cards. I got it for my birthday this year I think, from Gail Grant, who is a member of RSA group.
She has used an Inkadinkadoo collage stamp and the card is just stunning. I love the stamp, the card, the colors - everything in fact.
Have a brilliant week everyone.
Only 18 shopping days left till Christmas(including Sunday's and holidays).

Sunday, December 6, 2009

Vintage lady


Today's card was made ages ago for a Hero arts challenge. I have used a very fine cream mesh over the stamped image - its actually a mesh that is used in book binding I was told by the shop. I find it very effective but unfortunately doesn't photograph well on cards.
I have also used a paint chip sample on the card to place the buttons on - everytime I am in a store that sells paint, I grab a few more paint chip samples.
Materials: Antique gold mineralis cardstock, cream cardstock, black cardstock, cream mesh, handbag charm, buttons, pearl, cream organza ribbon, paint chip sample, gold encore ink pad, brown ink pad, Hero arts writing stamp and lady stamp.
Method: Fold antique gold cardstock in half to create base card. Take strip of cream cardstock and tear down one side and them using gold encore ink pad, stamp words repeatedly down the cardstock and attach to cardfront as shown. Using brown ink pad, stamp woman onto cream cardstock and heat set and then cover with cream mesh and secure at back and then mount onto black and then cream cardstock and to cardfront as shown. Attach paint sample strip and then add buttons to it. Attach organza cream ribbon and pearl and handbag charm.
Enjoy what's left of the weekend everyone.

Saturday, December 5, 2009

Stamping on Painted backgrounds


Today I thought I would share with you Stamping on painted backgrounds.
I adore my Lumiere paints - they have such a glow to them and they go on so smoothly and are easy to stamp on top of.
All you need to do for this technique is take Lumiere paint and paint a piece of cardstock with various colors - I used a sponge to dab the paint onto the card. ( have a light hand - that way the paint dries quickly and you are ready to stamp in about 5 to 10 minutes) If you don't have any Lumiere paint then try with normal acryllic paint ie Dala and add some highlights with the Metallic Dala paints.
Materials: Black, Copper and White cardstock, Copper embossing powder, Clear embossing ink pad, black brilliance ink pad, selection of stamps, rhinestones, Lumiere paints and sponge, Gold pen
Method: Take a piece of white cardstock and sponge Lumiere paints directly onto the surface of the cardstock using a sponge. Allow to dry. Stamp images using black brilliance ink pad and then go around edges with gold paint pen and mount onto black and then copper cardstock and then to cardfront. Use clear embossing ink pad to stamp word on cardfront and then emboss using copper embossing powder. Add rhinestones and you are done.

Friday, December 4, 2009

Highlighting Penny


I just love this card that I got from my friend Penny in Knysna. She is such a talented cardmaker.

I love her color combination of the Olive/Yellow/Brown/Orange. The stamp is so cute as well. Think its really clever how she did button centre for one flower and eyelet for the other - gives such a nice contrast.

Have a great weekend everyone.

Thursday, December 3, 2009

Floral button book


This is a little book that I made a while back with lots of buttons and flowers. I stamped the word ME on the front using Making Memories alphabet stamps with Acryllic paint. I also stamped onto the fabric flower using brilliance. Its such a cute little book and I keep meaning to fill it with photos - one day.

Wednesday, December 2, 2009

Lavender in my garden


Wow now this is a card I did yonks ago. It uses a Lavender stamp from Charmaine's Magic Ribbon and Cards. The background stamp on the purple card (watermark) is an old Stampendous one.


I was reminded of this card by the lavender that is growing in my garden. It started out as a baby bush about 2 years ago and is now about 1 metre wide by 2 metres tall and in full flower at the moment. I always find it amazing that when I water the garden with the hose and spray the lavender, I can smell it wherever I am standing.


Materials: Purple cardstock, green cardstock, white cardstock, Charmaine's lavender stamp, ribbon, black brilliance ink pad, tombow pens, Real dried lavender, Stampendous stamp, Watermark Versamark ink pad, Alphabet tiles, Pearls, Stickles glitter glue.


Method: Fold purple cardstock in half. Use versamark ink pad to stamp tiny flowers all over the front of the card using Stampendous stamp. Take Charmaine's stamp and use black brilliance ink pad to stamp it onto white cardstock. Color in using tombow pens and highlight areas with stickles glitter glue. Go around edges with color box chalk ink pad and then attach to purple and then green cardstock and then to cardfront. Attach alphabet letter tiles to spell out the word lavender and then add pearls, sprig of real lavender and bow.

Tuesday, December 1, 2009

Adorable me


Now this is one of my favourite photo stamps - She is just so adorable and she is from the Stamping Ground. Sorry but she doesn't seem to have photographed so well.
Materials: White cardstock, silver cardstock, Black cardstock, Glossy white cardstock, Purple organza ribbon, rhinestones, Archival black ink pad, Photo stamp by The Stamping Ground, Word stamp by Hero arts, Silver Encore ink pad
Method: Stamp photo image onto glossy white cardstock using archival dye ink pad and trim leaving white edge around photo. Mount onto black and then silver cardstock. Take Encore ink pad and stamp Hero arts words down a panel repeatedly and attach to centre of cardfront as shown. Secure ribbon behind photo and mount to card. Add rhinestones.
Enjoy your week - only 24 days till Christmas.