Monday, November 30, 2009

Highlighting Angella


Now I mainly started this blog to share my creations with others. Whilst looking last week though for some cards to photograph for the blog, I came across a whole box of treasured cards that I had received from fellow RSA Group members and other friends and I thought they really are too gorgeous to keep just for me to look at so I will be sharing 1 or 2 a week with you.

This is a collage card received from Angella in Durban. Love the colours she has used on the card. She said she was inspired by a card in the Australian Stamping and Papercraft magazine.

Sunday, November 29, 2009

Five minute card


Today's card is truly a five minute card. The stamp I think is a PSX one.
Materials: white cardstock, Red Brilliance ink Pad, Black Brilliance ink Pad, Heart Stamp by PSX, Red cardstock, Red heart gem, Love word stamp by Hero Arts
Method: Fold white cardstock to make a top fold 15 x 15 square card. Use black brilliance ink pad to stamp 4 hearts onto red cardstock and cut out and attach to cardfront. Attach gem and then use red ink pad to stamp Love word.
Enjoy the rest of your Sunday

Saturday, November 28, 2009

How I spend my Saturday's


Thought I would share some photos of how I normally spend my Saturday mornings - Card class time. In the photo on the left is

Debbie in the red jersey, Sharon, Lynne, Ronita, Joyce and Helen. This is one of a regular group that come for lessons once a month. We have great fun and normally manage to make about 6 cards in a morning using various techniques.


Of course the best part of the morning is tea time or when one of the group has a birthday and its pressie time.


The girls hard at work on another Saturday morning


The photo below was taken at another open Saturday morning which I have once a month. For a small fee you can come and use my stamps and Big Shot machine. This was us relaxing at tea time after a hard morning stamping up a storm.

Friday, November 27, 2009

On the Catwalk


Good grief it's Friday again and less than a month till Christmas.

You will be happy to know that I dug out a load of cards this week and photographed them all so that I have enough stuff to load till about Easter next year. Now its just to find the time to load it. Always interesting I find to look at cards you have made in the past as maybe like me your styles change. I seem to go through stages with my cardmaking although looking back the one constant thing is the Rhinestones.

Today's card uses a stamp from "The Angel Company" that looks like she has stepped straight off the catwalk. The words on the card are a stamp by Impression Obsession .

Materials: Black cardstock, white cardstock, red cardstock, pattern red scrapbook paper, woman stamp by TAC, Word stamp by Impression Obsession, Clear embossing ink pad, red embossing powder, black brilliance ink pad, radiant pearls, black fibers, handbag charm and a couple of red rhinestones of course.

Method: Fold A4 black cardstock to make top fold card. Take clear embossing ink pad and stamp words on rhs of card as shown and emboss with red embossing powder. Attach strip of red scrapbook paper to lhs of cardfront. Stamp woman image using black brilliance ink pad onto white cardstock and color in using radiant pearls. Attach to black and then red cardstock and then wind black wool around the image as shown and attach to cardfront. Attach rhinestones and handbag.

Have a great weekend everyone.

Thursday, November 26, 2009

Off to the ball


Now this stamp is still one of my favourite's. It's called "my mothers dress" by Inkadinkadoo. I have it in 2 sizes - one this size as a mounted stamp and then I also have it as a clear UM in a much smaller size.
Black cardstock, My mothers dress stamp, Black brilliance ink pad, white cardstock, tea stained paper, skeleton leaf, pink mesh, rhinestones, shoe, radiant pearls
Method: Fold black cardstock to form 15 x 15 square card. Attach torn music paper to the cardfront as shown. Attach a piece of pink mesh across the tea stained paper and a skeleton leaf in the corner. Add rhinestones and shoe. Stamp dress onto white linen cardstock using black brilliance ink pad and heat set and then cut out and color in using radiant pearls. Attach to cardfront.

Wednesday, November 25, 2009

Tape Transfer technique

Today's card demonstrates yet another very easy technique - Tape Transfers.

I always try and get the very wide cellotape for this technique - its about 6cm wide. I find that width is the easiest size as it covers most pictures. This technique will work with either a picture from a glossy magazine ie Fair Lady/Vogue etc or a toner based photocopy. Must be toner based not inkjet ie you can't print something on your HP printer and use that picture - photocopy it first on a toner based photocopier.

Technique Step by Step

1. Select your picture from magazine or your photocopy and trim it so that it roughly fits the width of your tape - doesn't matter if its slightly larger as you can just trim the edges once the tape is on. You then place the cellotape/Sticky tape over the image with the sticky side on the actual image itself.

2. Pour some warm water into the sink and then place your cellotaped image into the water. Leave it for about 30 seconds and then start rubbing the back of the cellotape. I do this under the water and you will see that little balls of paper come off and if you keep rubbing for a couple of minutes eventually you will get rid of all the paper and what is left is your cellotape with the image imprinted on it.

3. If it was a photocopy then the image will be black and white obviously and if the image was from a magazine it will be in full color. I then lay the image onto a towel with the shiny side of the tape down and leave it to dry well. You will then find that the cellotape regains some of its stickness once dry and is probably enough to then stick it onto some plain cardstock ready for mounting on your card.

It's as simple as that and it is really fun to see the results especially with magazine color transfers.

Today's card uses a photocopy image of a woman and child.

Materials: Black cardstock, clear embossing ink pad, silver embossing powder, tape transfer image, white cardstock, silver cord, butterflies, word stamp by Paper Inspirations, corner punch.

Method: Fold black a4 cardstock in half to create base card. Use clear embossing ink pad to stamp words onto cardfront as shown and emboss with silver embossing powder. Take tape transfer picture and attach it to white cardstock and then black cardstock and then white cardstock. Use the corner punch to punch the corners of the white cardstock and then thread silver cord around the white cardstock and attach to cardfront. Attach butterflies.

I hope you enjoyed today's technique and give it a try.

Tuesday, November 24, 2009

Looking back/Gold Paint spray paper technique


Now I had meant to look up who this stamp is by this morning but got involved with other things and totally slipped my mind. I love this image though - makes me feel peaceful.
This card was done using a paint technique I love and is so simple - take a can of paint and just spray it at your paper.
Materials: Black cardstock, gold cardstock, white cardstock, stamp, black brilliance ink pad, word charm, Gold Paint in Spray can
Method: Fold black cardstock to create side fold card. Add a layer of gold cardstock. take a piece of black cardstock and put it on newspaper and then spray gold paint over it - holding it at about a distance of 60cm so that you get drops of paint on your cardstock. Once dry attach this layer to your card. Using black brilliance ink pad stamp image onto white cardstock and matt with black and then gold cardstock and attach to cardfront. Attach mats of gold and then black and then word charm.

Honest award


I was very honoured to receive this blog award from Amanda DJ last week. I am meant to share 10 honest things about myself.
1. I prefer my own company - always have since I was a child.
2. I am a "bit" compulsive obssessive - my mother calls me Mrs Monk after the detective in the TV series. I can't go to bed without straightening the cushions on the lounge suite etc etc.
3. I am a list maker - I make lists for everything and am very organized and neat and tidy. Nothing I like better than crossing things off a list.
4. I love winter and stormy weather and hate Summer.
5. My other passion in life apart from paper crafts is reading - James Patterson is one of my favourites - I think I have shares in Exclusive books.
6. I was born to shop or at least that is what my mother tells me.
7. I adore angels and have loads all over my home and my garden - they make me feel so peaceful when I look at them.
8. I have a very active imagination.
9. I have a phobia about crocodiles - I have had nightmares about them since I was about 3 years old.
10. I love being single - it just works for me.
Now to pass on this award to other fellow South African Stampers. You rock girls.
1. Helen
2. Paola
3. Rene Sharp

Monday, November 23, 2009

Men - can't live with them can't live without them


This is an ATC I made for the recent "for the boys" swap. I just love the saying - "I keep him at the bottom of my garden for a rainy day". Just too much.
Stamp is by Crafty Individuals but I did stamp it and then reduce it to make sure it fitted onto the ATC. Background papers are from a download and then memories word charm. I coloured the image using color box ink pads and went around the edges with gold pen.
Enjoy your week.

Sunday, November 22, 2009

Notebook Holder or Stationary holder


Hope everyone is having a lovely weekend. Christmas is nearly upon us and now's the time to start making gifts for people. I made this notepad holder a while back and always find it very popular. It has a little pocket inside that you can use to put credit card slips/small notes etc. Alternatively what I do is make a pocket on each side on the inside and then put envelopes in the one and cards in the other side.
If you want the instructions for this please email me and I will happily send them through to you.
Enjoy what's left of the weekend

Saturday, November 21, 2009

Exploding box technique


I


I thought I would share the exploding box technique with you today. You can have a lot of fun with these boxes and if you have an embossing board they are very easy to make as you don't have to sit and measure. Embossing boards are wonderful for this type of construction card as it saves having to sit there with a ruler and pencil and measure everything. I have left this box plain on the outside with just a flower on top and ribbon around the lid, but you could of course decorate the outside of the box panels as well. For the inside you have three layers of paper each with four panels to decorate and the centre panel, which you only need decorate for the last layer as the other layers are covered as you stick it all together under the centre panel.
This is a stunning project for that wow factor - present and card in one, good for using with photos as an "off the page" scrapbook. Also lends itself very well to themes - ie butterflies, fairies, christmas, marine, baby etc.
Materials required:
1 x cardstock 297mm square
1 x cardstock 290 mm square
1 x cardstock 285mm square
1 x cardstock 15cm square for lid
Ruler/Pencil/Pegs/Glue/Foam pads/Scoreboard
Stamps/inks/papers/embellishments to decorate
Note: I used Bazzil cardstock for the box in this example.
Technique:
1. Take each of your 3 larger squares of paper and place up against the butt bar on the embossing board and score all 4 sides using the A4 Trifold line if you are using the Crafters Companion Ultimate board, DL5 line if you are using the Diamond card craft blue board. You then cut out the four corner squares on each sheet and set them aside to use later when you decorate the box as you can use them for layering.
2. Take your lid cardstock and place on the box lid section of the Crafters Companion ultimate board and score on line 2 all the way around. If you are using the Diamond card craft blue board then use line 2 for the lid.
3. Fold in all the score lines on the lid and cut notches in the corners and glue in place and use pegs to hold it together whilst the glue dries. You can use Double sided tape but I find wet glue holds the box together better.
4. Decorate your layers on the bottom of the box - all four panels on each of the 3 layers and then the centre panel only for your top layer. Attach the 3 panels together using foam tape under the centre panel only.
5. Decorate your lid and then fold up your lower part of the box and pop the lid on. Simple as that.
Have fun and if you don't have a score board you can always email me for the measurements.

Friday, November 20, 2009

Late Late Late


Wow so late in posting today that I even got a phone call to see if I was ok from someone. The time thief stole this week from me and made it disappear. Had every intention of preparing this upload earlier this week but ........

Todays card is a small card just for a change - gasp Helen. This is a real oldie that was up on my pinboard at home.

This weekend I will share an exciting project - an exploding box so do keep visiting my blog.

Wishing everyone a good weekend from a very hot and very sticky Cape Town. When's winter coming back I ask myself..........

Thursday, November 19, 2009

Fabulous


Now how cute is this. Got it from a new friend called Nel. She says I must name my 5 favourite things so here goes.
1. McDreamy from Grays antaomy
2. Audi TT
3. Cream Roses
4. Candyfloss
5. A good book
Thanks again Nel.

Wednesday, November 18, 2009

It's Christmas time - well nearly


Another christmas card idea for you today, using a stamp from Denami Designs.
Materials: Black cardstock, Gold cardstock, Christmas red and green printed papers from Making cards magazine insert, Denami Stamp, Cuttlebug Swirl embossing folder, Copic Pens, Stickles glitter glue, Green ink pad, white cardstock, red stickles glitter glue, black brilliance ink pad, ruby red color box ink pad
Method: Stamp image onto white cardstock and trim to size. Go around edges with green ink pad and then color in image using copic markers and highlight areas with stickles glitter glue. Fold black cardstock to create top fold square card and attach gold cardstock. Trim christmas patterned papers to size and go around edges of green with green color box ink pad and the red with red color box ink pad and attach to cardfront as shown. Run strip of gold cardstock through big shot using Cuttlebug swirl embossing folder and attach to card and then attached stamped image. Attach rhinestones.

Tuesday, November 17, 2009

Photo stamping


Now I have only just noticed that the photo I took of this card appears to have a halo effect on the poor man's head. Guess the sun was just hitting the glossy cardstock at an angle and reflecting of it.
Another photo stamped image today. This is a great card for a man.
Materials: Archival brown dye ink pad, white glossy cardstock, black cardstock, scrapbook pattern paper, copper cardstock, rhinestones, word charm.
Method: Fold black a4 cardstock in half to create base card. Go around edges of scrapbook paper with amber color box ink pad and attach to cardfront. Stamp photo image of man onto white glossy cardstock using archival ink pad and then trim leaving white border and attach to copper cardstock. Add rhinestones and word charm which says - The Joy of discovery

Monday, November 16, 2009

Just married/Photo stamping technique


Today's card uses a photo stamp from Stampsmith - they have really lovely photo stamps.
Photo stamping require's a little bit of extra patience to get a really good image. In order to use a photo stamp you will need to use a dye ink pad - I have tried most of them and personally I find that Archival dye ink pads work the best for me. Others that are good include Versafine and Memories.
You will also want to stamp onto glossy cardstock - now I find that the very very glossy cardstocks don't work for me so I use low gloss paper - either a paper called Novatech that I buy locally in SA or alternatively a low gloss paper that I buy from Oxford Impressions. Both work brilliantly.
The first step in photo stamping is to make sure that your stamp is clean and free of any bits of dust/glitter/powder/cats hairs etc. I normally take a bit of double sided tape and tap it onto the stamp all over to make sure that I pick up any stray bits. If you are using an unmounted photo stamp I also find its best to stamp onto a mouse pad so that you have that bit of extra cushion as it were. The next step is to ink up your stamp well. Some people use a brayer but I don't bother. Then its time to stamp your image onto the glossy paper. Press firmly and keep pressing for at least a minute or so - don't rush this bit otherwise you will find that parts of your image have not transferred. Then hold the paper with one hand and carefully lift off the stamp.
If you don't have a perfect image don't despair - vintage photos often arn't perfect as they have spots and scratches on. Also you can easily disguise any imperfections by placing vellum on top of the photo as I did on this card(not that I didn't have lovely image on this occasion)
Photo stamping gives you some really wonderful results but you do need to work slowly and no rush the process. I find if I am slightly tired then that results in less than perfect images so it really is a technique that you must do when you have spare time and plenty of energy. If you like photo stamps but arn't having much luck with the images then I can highly recommend the Toybox photo stamps as they seem to give perfect image nearly every time. I also often find that mounted photo stamps seem to work a bit easier than the unmounted images.
Now on to today's card.
Materials: Black cardstock, Silver cardstock, White glossy cardstock, Vellum, Black and white dot paper, Stampsmith photo stamp, Black Archival dye ink pad, Rhinestones
Method: Stamp wedding image as per above instructions onto white glossy cardstock and allow to dry. Fold black cardstock to create top fold card. Attach silver and then black and white spot papers to cardfront. Then attach layer of silver and layer of black cardstock to cardfront. Attach photo image and then place piece of vellum (i tore the bottom edge) over the photo and secure in place with 2 small glue dots and place rhinestones over the glue dots.
Do give photo stamping a go - it really is a brilliant technique.

Sunday, November 15, 2009

Its a snowy Christmas


Another Christmas card idea for you today. Can't believe Christmas is coming.
Materials: White cardstock, Blue Bazzil cardstock, MFT Stamps, Blue Brilliance ink pad, Joy to the world paper from Seasons Greetings CD by Elusive Images, Rhinestones, White organza ribbon, silver snowflake charm, blue color box ink pad, black brilliance ink pad, glue pen, Clear glitter, white flowers, copic pens
Method: Fold white cardstock to create top fold square card. Print out sheet of blue Joy to the world paper from Elusive images CD rom and trim to size. Go around edges of paper with color box ink pad and attach blue Bazzil and then printed paper to cardfront as shown. Before securing it to cardfront wrap ribbon around printed paper and secure at back. Use black brilliance ink pad to stamp Snowman and girl image onto white cardstock and trim to size. Go around edges with color box ink pad and then attach to blue cardstock. Color in image with copic markers and then fill snowman and fur trim on boots with clear glitter using glue pen. Attach image to cardfront. Attach flowers, rhinestones and snowflake. Stamp Baby its cold outside MFT stamp using blue brilliance ink pad onto bottom right hand corner of card

Saturday, November 14, 2009

Vintage Christmas


Today's card just oozes sparkle and bling. It is one of those cards that are much better in real life as then you can see all the sparkle from the glitter.
The poinsettia and snowglobe images are from a Vintage Christmas CD and the backing paper is from an Elusive Images Seasons Greetings CD. The pearl/diamante bling strip at the bottom of the card is from a Chinese shop kindly bought for me by Debbie. Its really super sparkly bling and of course this girl loves her bling.
Materials: Seasons Greetings Elusive Images CD background paper, Brown cardstock, Pink Bazzil cardstock, Mauve bazzil cardstock, white cardstock to print poinsettia and snowglobe image onto, Vintage Christmas CD images of snowglobe and poinsettia, bling, tiny pink pearls, rhinestones, clear and very pale pink glitter, glue pen, small diamante, dusty pink color box ink pad.
Method: Fold brown cardstock to create square top fold card. Go around edges of pink and mauve cardstock with color box ink pad and attach to cardfront. Print out sheet of paper from Elusive images Seasons Greetings CD and trim to size and go around edges with color box ink pad and attach to cardfront. Print out Poinsettia image and snowglobe from Vintage Christmas CD onto white cardstock and cut out. Go around the edges of the snowglobe - just the globe part with glue pen and sprinkle with Clear glitter. Go over the tinsel on the bottom part of the snow globe with Stickles clear glitter glue and attach 3 small diamante. Attach snowglobe image to cardfront and then attach poinsettia. Go over areas of poinsettia with glue pen and sprinkle with pale pink glitter. Attach small pink pearls to the centres of the poinsettia. Attach rhinestones in the top corner as shown and then attach row of pearls/diamante bling at the bottom of the card.
Wishing everyone a happy weekend.

Friday, November 13, 2009

Dreams photo card


And believe it or not it's Friday again. Where does the time go to. It seems to be flying by.
Today's card is very simple and uses a photo from Joanna Sheen.
Materials: Black cardstock, Joanna Sheen woman and child photo, Dreams word stamp by Stampers Anonymous, Black Brilliance ink pad, Dictionary scrapbook paper, Butterfly charm.
Method: Mount photo onto black cardstock. Attach scrapbook paper to cardfront and use black brilliance ink pad to stamp the word dreams. Mount photo and add butterfly.

Thursday, November 12, 2009

Listen to the music


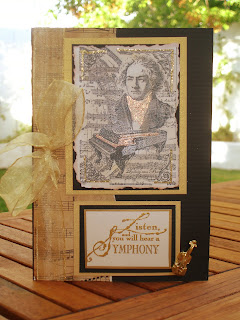
And to complete the Musical triology of cards this week, here's another musical card for you.

Materials: Black cardstock, gold cardstock, tea stained music paper, cream cardstock, gold pen, cream organza ribbon, Music collage stamp, Words stamp, Gold embossing powder, clear embossing ink pad, clear glitter, black brilliance ink pad, musical violin charm, color box inkpad, Glue pen

Method: Fold A4 piece of black cardstock in half to create base card. Stamp Music collage using Black Brilliance ink pad onto white cardstock and tear around the edges and use a color box ink pad. Mount onto black and then gold cardstock. Stamp words using clear embossing ink pad onto white cardstock and then emboss with gold embossing powder. Go around edges with gold pen and then mount onto black and then gold cardstock.

Tear a strip of tea stained music paper and attach to cardfront as shown and then attach your stamped pieces. Tie ribbon in a bow and attach violin. Go over areas of music collage with glue pen and pour on clear glitter.

Wednesday, November 11, 2009

Angels


Today's card uses a photostamp from Stampsmith.
Materials required: Black cardstock, gold cardstock, glossy white paper, tea stained music paper, violin charm, pearls, black dye ink pad, word charm
Method: Using black dye ink pad to stamp image onto white glossy cardstock and then trim to size and mount onto black and then gold and then black cardstock. Fold A4 piece of black cardstock in half to create base card and then add layer of gold and then black and then tea stained music paper. Then add stamped image. Add pearls, violin and word charm.
Have a musical day

Tuesday, November 10, 2009

Butterfly music


Wow seems that blogger is back to normal today. One gets so excited when technology actually works..........
Materials: Black card stock, Tea stained music paper, cream organza ribbon, Great impressions Butterfly stamp, Pearl ex watercolor paints, clear embossing ink pad, gold embossing powder, clear embossing powder, music stamp.
Method: Fold black cardstock to create 15 x 15 square fold card. Using clear embossing ink pad, stamp music all over the front of the card and emboss using gold embossing powder. Take a piece of tea stained music paper and tear and place in corner of card as shown. Use clear embossing ink pad to stamp butterfly onto black cardstock and emboss with clear embossing powder. Cut out butterfly and color in using pearl ex palette watercolor. Attach to cardfront. Tie an organza bow around.
May the internet behave all day today so that I can get lots done.

Monday, November 9, 2009

Blog

Well it appears that blogger doesn't want to co operate with me today and isn't
loading properly so I can't upload any photos. So guess no posting today.

Have a great Monday.

Sunday, November 8, 2009

The ball

This is an old favourite stamp from Stampendous.

Materials: Black cardstock, Silver encore ink pad, Clear embossing ink pad, Silver embossing pwoder, Silver show, Silver netting, stickles glitter glue, bodice stamp by Stampendous, Writing stamp by Hero Arts, needle and thread, diamante, white cardstock, Foam pads.

Method: Fold black cardstock to form base card. Stamp bodice onto white cardstock and emboss with silver embossing powder and cut out. Gather up netting for skirt using a couple of stiches with needle and thread and attach to the back of the stamped image. Take silver Encore ink pad and stamp writing repeatedly over front of the card and then attach bodice with skirt using foam pads on the bodice only. Highlight areas of bodice with silver stickles glitter glue and then attach a few clear rhinestones.

Saturday, November 7, 2009

Shattered Glass technique


Something different for me - African style card using shattered glass technique. I have to say that I don't do African images on cards all that often.
I thought I would use this card though to demonstrate a slightly different take on the Shattered glass technique using Lumiere paints. If you don't have any Lumiere paints don't worry you can use Dala Metallic paints - they work as well.
The most important thing to remember when doing this technique is that you need low tack masking tape. Now if you were in America, believe it or not you can buy what they call low tack masking tape but here where we can only get regular masking tape, you can easily make it low tack and clean your outfit at the same time - how you ask. Tear off strip of masking tape and for this technique I use the tape that is about 3cm wide and I also tear down each outer edge so that I am left at the end with two rough sides. Before you tear down the outer edges though place the tape on your clothes and lift off - do this several times and you will have clean clothes with no stray hairs on and also you will have low tack masking tape. It is important to get rid of most of the stickiness of the tape otherwise it will stick like glue to your paper and you won't be able to tear it off later without leaving marks on your paper.
Ok now that you have your low tack tape, tear down the outer edges of the tape so that you have two torn sides and then take black cardstock and place tape where you don't want paint. Once you are happy with design then take sponge and sponge on Lumiere or Dala paints and allow to dry. Carefully lift off the tape and you will be left with rough edged paint design on the paper. Once it is dry you can then stamp onto the paint using Brilliance black ink. I have used animals on the card above. I then mounted my pieces onto copper cardstock and then to cardfront as shown.
Shattered glass is a super technique and real quick to do. I normally paint up several sheets at a time and that way you get dig a piece out when you want to make a card and its quick then just to stamp it up and mount it onto a card.
Hope you enjoy this technique.

Friday, November 6, 2009

Pop out Cards Technique


I love making pop out cards and they are so easy to do and so effective. These and funnily enough shaker cards always seem to get the most comments even from people that don't normally pay any attention to my cards. I use templates by Ws Designs which are great and make the whole thing so easy
This one uses their Large arch pop out template.
Materials: Two pieces of A4 cream cardstock, Penny black scroll vellum, selection of angel stamps, clear embossing ink pad, gold embossing powder, white thread, star die cuts, gold pen, large arch template, alcohol inks, acetate, violin, I believe in angels stamp by PSX,alcohol ink tool, pencil and ruler, copper cardstock, 4 small brads, tea stained music paper rolled up into a scroll and tied with small piece of ribbon, Cuttlebug swiss dot and swirl folders.
Method: Fold both pieces of cream cardstock in half and score well and set one aside. This you will work on just now when you do the inner part of the card. For now lets complete the outside of the card. I took some acetate and used the alcohol inks tool and alcohol inks to pounce the alchol inks over the acetate. I then stamped the angel image onto cream cardstock and then mounted it over a piece of copper cardstock that I had cuttlebugged and then added the acetate and fixed it together with 4 small brads. I then took some scroll vellum from Penny black and wrapped it around the fold of the card leaving about 1.5 cm at the back of the card with the rest of it showing on the front. I then added the stamped image. I stamped the words and embossed them and mounted again onto copper card that I had cuttlebugged and attached to cardfront using foam dots. I then added the music scroll and the violin. Now lets work on the inside of the card. Take your other folded piece of cream cardstock and place the arch pop out template on the fold line and trace around the template with a pencil and make marks at the notches on the template as this is where you will score another line. Flip template over and mark score marks on the other side of the card - no need to trace template again as you will simply just cut through both layers of card around your pencil marks and viola you have your arch. Score the two lines and fold well. You will now see the you have four panels if you like - the middle two containing your arch and then one of each side of that. On the two outer panels stamp angels and emboss. Go around edges of card with gold pen and make sure you have rubbed out any pencil marks that may be showing. Then take your outer card and open it up and tape in scroll vellum - doesn't have to be the width of the card as it just needs to sit behind your pop out template. Then tape up just the two outer panels of your inner card and attach to the inside of your outer card. Attach star die cuts that I cuttlebugged with Swiss dot folder above the arch and then take two star die cuts and place a piece of white thread running between them and glue together and then attach one piece of the cotton thread to top part of the pop out and the other piece to the bottom. You will now have what looks like a floating star inside your card.

Thursday, November 5, 2009

Spot of Yoga anyone


Now I could do with a bit of yoga in my life right now - to balance my ying and yang. Life seems to be rushing by at a furious pace and would be go to have some relaxing time. Oh well a girl can dream.
Materials: Stamping Bella stamp, White cardstock, Green cardstock, Strip of green pattern paper, Flowers, Rhinestones, Needle pricking tool, tombow pens, green color box ink pad, black brilliance ink pad
Method: Fold white cardstock in half to form cardbase. Go around edges of green cardstock with needle pricking tool so you are left with what looks like a row of stiches and attach to cardbase. Attach strip of green pattern paper and rhinestones and flowers. Stamp image onto white cardstock and color with tombow pens and then go around edges with color box ink pad and attach to cardfront as shown.

Wednesday, November 4, 2009

All seeing eyes


Today's card uses some lovely gold fibers that I bought in America last year on my trip to the Panama Canal.
Materials: Black cardstock, Penny black scrapbook Chinese paper, Penny black music vellum, gold fibers, Scrapbook G letter, rhinestones, Penny Black scroll vellum, Gold pen, Face stamp, Black Brilliance ink pad, amber color box ink pad
Method: Fold black cardstock to form base card. Go around edges of Penny Black Chinese pattern paper with amber color box ink pad and then wrap fibers around and secure them at the back of the paper and then attach to cardfront. Stamp face image using black brilliance ink pad and go around edges with gold pen and then attach to black cardstock and wrap scroll vellum around the top of image. Attach torn corner of music vellum paper to cardfront in bottom right hand corner and then attach stamped image as shown. Add the G for girl and the rhinestones.

Tuesday, November 3, 2009

Men are like Cheese and fine wine


Today's card uses another stamp from Stamps Happen - don't you just love the saying on it.
Materials: Black cardstock, white cardstock, red pattern scrapbook paper, red bazzil cardstock, black die cut tag, flowers, word charm, rhinestones. clippola, tombow pens, red color box ink pad, black brilliance ink pad
Method: Fold black cardstock to create base of card. Go around edges of red scrapbook paper with red color box ink pad and attach to cardfront. Attach strip of red cardstock as shown. Use black brilliance ink pad to stamp image onto white cardstock and color in with tombow pens and go around edges with red ink pad and attach to cardfront. Attach die cut tag using foam tape and then attach word charm, flowers, clippola and rhinestone.

Monday, November 2, 2009

Wow November is here


Can someone please tell me where this year has gone. It seems to have flashed by so quickly. Can't believe its November already - nearly Christmas and still so much to do before that comes.
Today's card uses an image from one of my favourite companies - Stamps Happen.
Materials: Black cardstock, gold cardstock, white cardstock, mauve and pink pattern scrapbook paper, Stamps Happen stamp, Black Brilliance ink pad, Glue pen, Gold glitter, Prima flower, Metal word charm, watercolor pencils, waterbrush, gold pen.
Method: Fold black cardstock to form cardbase. Add strip of mauve pattern scrapbook paper to cardfront as shown. Use black brilliance ink pad to stamp image onto white cardstock and go around edges with gold pen and mount onto black and then gold cardstock and then to cardfront. Colour in image with watercolor pencils and highlight areas with glue pen and add gold glitter. Add flower and word charm.