Monday, December 21, 2009

Highlighting Shamela


Now as promised on Friday, herewith Shoe card received from Shamela. Isn't it great and so different from Angella's gorgeous shoe on Friday, yet they were both made with same template - just different color papers and wow.
Have a great week everyone and I hope you are enjoying the cards I am highlighting from friends.

Sunday, December 20, 2009

Grid Stamping Technique


Today's card makes use of the Grid Technique.
Here you can see the grid fairly defined. On Tuesday I will show you same technique used on a card but instead of squaring off the central image I used more of an angle and it changes the whole perspective of the grid.
You can do the grid technique either using glossy paper and dye inks or alternatively using matt paper and I use color box cats eye ink pads. I have used the second option here.
There are several excellent grid stamping technique sites with detailed step by step pictures, so I would urge you to go have a look at how this technique is done.

Saturday, December 19, 2009

Stamping on CD's


I got given a whole box full of old computer CD's a few years ago and had to work out how to use them on a card - being a stamper you can never just throw anything away can you. After experimenting a bit I found this technique worked for me.
Technique: Take Lumiere or Dala Metallic paints and a sponge and sponge paint onto the cd lightly. You don't want to do it too heavily as otherwise it will take ages to dry. If you have done it lightly then it should be dry in about 15 to 30 minutes. I normally paint up a whole lot of cd's at once so that they are ready to stamp onto. You can then stamp using black brilliance or black staz on ink pad and again it will take about 5 to 10 minutes for the ink to dry before you can attach it to your card.
Materials: Cream cardstock, CD, Lumiere or Dala Metallic paint, Black Brilliance or Staz on, Selection of butterfly stamps, Hero arts word stamp, butterfly charm, stipple brush or old fashioned shaving brush works well for stippling, amber and butterscotch dye ink pads, Skeleton leaf
Method: Fold cardstock in half to create square 15 x 15 card. Sponge paint onto CD as described above and then when dry stamp with selection of butterfly/word stamps. Stipple amber and butterscoth onto cardfront using stipple or shaving brush and use same ink pads to stamp butterflies directly onto cardfront. Attach skeleton leaf and then CD and butterfly charm.
Hope you will give stamping on CD's a go.

Friday, December 18, 2009

Highlighting Angella


Now isn't this an adorable card using my favourite subject - shoes. Can a girl ever have too many black shoes........
Angella was inspired by a template that appeared in the Australian Stamping and Papercraft magazine. Funnily enough I got another card using this template from Shamela which I will highlight on Monday just to show you how different they are - both stunning.
Have a lovely weekend everyone.

Thursday, December 17, 2009

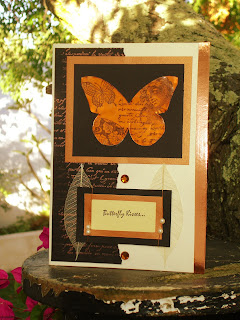
Stamping on Copper technique


For today's card I have stamped onto copper sheeting. Staz on is brilliant for stamping onto the copper sheeting as the surface of the copper is rather slippery and the staz on dries pretty quickly.

Technique: You can buy copper metal sheeting from most stamp shops. It also comes in gold, silver and sometimes you can find blue/green etc. When stamping onto the metal you need to use something like Staz on ink pad that was designed especially for stamping onto surfaces like metal/ceramics etc. If you make a mistake and don't like your image you can wipe it off and start again - you may need to use a bit of stamp cleaner when you wipe it off. Be careful when cutting out shape from the metal as the edges can be sharp. You will find the Staz on dries in about 5 minutes but you can also heat set it if you want to.

Materials: Cream cardstock, black cardstock , copper cardstock, copper magic ribbon, copper sheet, copper wire, small beads, rhinestones, skeleton leaves, selection of stamps, hero arts writing stamp, Staz on ink pad, black brilliance ink pad, copper encore ink pad

Method: Fold cream cardstock to create base card. Run strip of copper magic ribbon down right hand edge. Take copper encore ink pad and stamp Hero arts words repeatedly and then tear edge and secure to cardfront as shown. Take a butterfly shape out of the copper metal sheet and then use Staz on Black ink pad to stamp several images and allow to dry. Attach to black and then copper cardstock and then to cardfront as shown. Attach rhinestones. Stamp butterfly kisses words onto cream cardstock with Black Brilliance ink pad and wrap copper wire around with small beads on and attach to copper and then black cardstock and then secure skeleton leaves to cardfront and attach stamped word.

Have fun and enjoy stamping on metal - it adds lots of texture to your card and is something a bit different from stamping on paper.

Wednesday, December 16, 2009

Angel on Domino/Stamping on Domino's technique


Today's card uses an image stamped onto a domino. Stamping on domino's is great fun and really easy - it just takes a minute or two extra patience. You can make up fabulous jewellery using the stamped domino images ie image instead of putting this on a card, you could put a pin on the back and use as a brooch - I have one and lots of people comment on it. Another great idea is to get someone with a drill to drill holes in the sides of the dominos and then stamp up several and thread threw jewellery elastic and make up a braclet - it is very striking and unique and bound to draw lots of comments.
Another idea is to use domino on a chain around your neck. So really you can make unique gifts from domino's which cost very little from the Crazy store.
Materials: Black cardstock, copper cardstock, cream cardstock, vellum, domino, gold angel wings. joy word stamp by Hero arts, eyelets, domino, lumiere or dala metallic paints, black brilliance or staz on ink pad, copper beads and wire.
Method: Fold black cardstock to create base card. Attach copper and then black cardstock. Take square of vellum music paper and attach to cream cardstock using four eyelets in the corners and attach to cardfront. Take paint (I used Copper Lumiere) and paint domino by sponging on the paint and leave to dry. Once paint is dry use black brilliance or black staz on to stamp Mischief angel stamp from Stampers Anonymous onto domino. When stamping on domino, if you have painted the domino first it is not that slippery so its easy to stamp onto. I normally ink up my stamp and then place stamp on my desk with inked side facing up and then I take the domino and place it onto the part of the stamp i want and press down firmly and then lift off. Worst case scenario if you don't like the image then you can use thinners to remove the paint and image and start again. If you havn't painted the domino, you can still stamp directly onto the domino but it will be a little bit more slippery so grip it firmly when pressing it on the stamp and lift off. Again if you don't like the image or its not perfect then just use staz on stamp cleaner to remove image and wash the domino and then stamp again. You can then color the image using dye ink pads or sharpie markers. I often use a gold pen to do the sides of the domino. Ok so on with the card. Wrap copper wire and small beads around the domino and then attach angel wings and secure to front of card. I then added two small round stickers.
I hope this inspires you to give stamping on domino's a go. Its great fun and ideal for making up some last minute unique christmas presents and best of all its really cheap if you get the dominos at the Crazy store.

Tuesday, December 15, 2009

Using wire and beads


Today's card uses an image from Stampington. This is one of those cards that you could use for Christmas or any occasion really.
Materials: Cream cardstock, copper cardstock, black cardstock, tea stained music paper, copper magic ribbon, stamp by Stampington, copper wire, beads, pearls, word stamp by Hero arts, Copper Encore ink pad, black brilliance ink pad, color box ink pad - amber, gold ribbon
Method: Fold cream cardstock to create base card. Take strip of black cardstock and using copper encore ink pad stamp Hero arts words repeatedly and then tear edge of cardstock and attach to cardfront as shown. Attach strip of copper magic ribbon to right hand edge of card. Use black brilliance to stamp image of angel onto cream cardstock and color using DTP with amber color box ink pad. Wrap copper wire around image and thread on tiny beads. Attach image to black and then copper cardstock and then to cardfront as shown. Attach pearls and roll up strip of tea stained music paper and tie with gold ribbon and attach to cardfront.