Saturday, October 31, 2009

Happy Halloween

Life seems to be rather hectic lately and have been rushing around like a mad thing all week so thought I would take the weekend off from posting cards and will be back with more cards and techniques next week. I finished my Advanced PSP 201 course this week with Marilyn. Now isn't the certificate adorable. I adore teddy bears.
It's certainly been very interesting learning about what you can do with Paint Shop Pro. Now to find the time to start making my own backing papers and decoupage sheets.

Hope you are going Trick or Treating tonight - remember " Trick or treat, Kiss my feet, give me something good to eat." Enjoy.

Friday, October 30, 2009

Alcohol Ink technique - Part 2


Ok today another way to use those alcohol inks - on Acetate.
Technique:
Take a piece of acetate and then take your alcohol inks and put say 3 colors onto the alcohol ink tool and pounce it over the acetate until you are happy with the color. Allow to dry. You can stamp directly then onto the acetate if you wish. I would recommend using Staz on and stamp on the opposite side to what you used the alcohol ink on. Alternatively you can use the acetate to cover a stamped image which is what I did with this card shown here.
Materials: Cream cardstock, acetate, gold cardstock, black cardstock, Penny black scroll vellum,Cream textured cardstock, black fibers, 4 gold brads, gold krylon pen, rhinestones, word charm, Great Impressions dragonfly stamp, stickles glitter glue, Alcohol inks and tool.
Method: Fold cream cardstock in half.Add strip of foiled vellum and patterned textured cream cardstock strip down the left hand side of cardfront as shown. Take a piece of acetate and prepare it using alcohol inks as described above and leave to dry. On a piece of cream cardstock stamp dragonfly image and fill in areas of wings using Stickles glitter glue and allow to dry completely. Take dry alcohol inked acetate and attach it to the dragonfly image using gold brads and then attach to gold cardstock and then wrap black fibers around and then attach black cardstock. Attach piece to cardfront as shown. Add rhinestones and word charm.
The card unfortunately hasn't photographed that well - its actually much prettier in real life when you can see the glimmer from the Stickles showing through the alcohol ink piece.

Thursday, October 29, 2009

Alcohol Inks and Dominos techniques


Thought I would share another two favourite technique today- Alcohol inks and stamping on Dominos.
Alcohol inks
I have used a selection of the Tim Holtz Alcohol inks on this project. For the card all I did was add a couple of colors of the alcohol inks to the Alcohol ink tool and then pounce it over glossy cardstock. Once I was basically happy with the colors, I then added a drop of blending solution and let it do its own thing.
Domino Stamping
Because of there slippery surface I find its best to stamp with Staz on but I have also had success with Brilliance although it takes longer to dry and doesn't work perfectly everytime. I find it is much easier to ink up your stamp, and you don't have to choose small stamp to fit domino, it can be large collage type stamp. Once you have inked up the stamp with Staz on, lie the stamp flat on the table inked side up and then choose which bit of stamp you want on your domino and simply press the domino firmly into the stamp and lift straight up. If you don't like your first image remember you can use Staz on cleaner to remove the image and let it dry and just start again. I would do this several times just to practice if you are new to stamping on dominos. For this domino, all I did was put 3 different colours of the alcohol inks onto the blending tool and then pounced them over the domino and left it to dry. I then stamped the image with Staz on and went around the edges with a Krylon gold pen.
Materials: Black cardstock, glossy cardstock, Gold cardstock, Stampers Anonymous stamp, Staz on Black , Rhinestones, Alcohol inks and blending solution and alcohol ink blending tool, butterflies, gold embossing powder, word stamp, clear embossing ink pad, Letter P sticker, Gold krylon pen, Domino.
Method: Fold black card to create base square card. Prepare domino as described above and also prepare stamped glossy cardstock as described above. Go around edges of glossy stamped image with gold pen and attach to black and then gold cardstock and then to cardfront. Use clear embossing ink pad to stamp words and emboss with gold embossing powder. Attach domino, rhinestones and butterfly and letter P sticker.
I will share with you another way tomorrow to use your alcohol inks. There are some stunning new colors out. What to do if you don't have any of the Tim Holtz alcohol inks - cry - no seriously you can try the technique using Copic refills (they are alcohol ink after all) or try any die reinkers.

Wednesday, October 28, 2009

Credit card technique


This card makes use of one of my favourite techniques - credit card technique.
Technique Instructions:
I normally use the inner wrapper paper of normal gift wrap - its usually a light grey very thin cardboard. Alternatively any cheap cardstock will work - not too thick as you need to be able to crumple it up. I then scrunch it up in my hands and then flatten it out and spray it with water. I then add a couple of dollops of paint - I use Lumiere paints but Dala our local brand work just as well, the dollops should be about the size of a R5.00 coin. I then use credit card to spread the paint across the paper. Add more paint if required. When you are happy with your paper leave it to dry and then once dry you can stamp on it. Makes for lovely background paper which has a texture in it.
Materials for card: Black cardstock, copper cardstock, inner cardboard from gift wrap tube, cream cardstock, butterflies, black brilliance ink pad, Stampers Anonymous word stamp, Prima flowers, rhinestone,Paper Artsy woman stamp, Copper pen
Method: Prepare the background as described under technique above. Once dry use black brilliance to repeatedly stamp background words. Take A4 black cardstock and fold in half to create card base. Add layer of copper and then black cardstock and then your credit card technique paper. Use black brilliance ink pad to stamp woman onto cream cardstock and go around edges with copper pen and then attach to black and copper cardstock and then to cardfront as shown. Add flowers with rhinestone and butterflies.
Hope you enjoy this technique.

Tuesday, October 27, 2009

I am late today


Wow I am late posting today. Life has been so hectic these past 24 hours and time ran away with me.
Today's card is a very quick card using Sissix die cuts.
Materials: Black cardstock, silver scroll paper, Mauve bazzil paper, flower punch, dress and handbag die cuts by Sissix, rhinestones, Pink wool.
Method: Fold black cardstock to create side fold card. Attach strip of silver scroll paper as shown. Use Big Shot to die cut handbag and dress form. Wrap pink fibers around dress form and attach both to cardfront as shown. Use daisy punch to punch out flowers and attach along with rhinestones.

Monday, October 26, 2009

Touring


Card today has a lovely vintage type feel to it I thought.
I have used B Bline image for the car and the word touring. I do love their stamps.
Materials: Black cardstock, gold pen, brown cardstock, cream cardstock, Penny black Foiled script paper, Penny black foiled vellum, Autumn leaves swirl, Car image and Touring image by B Line designs, buttons, old car, Letter T K and Co, brown brilliance ink pad, caramel color box ink pad, black brilliance ink pad.
Method: Fold black cardstock in half to use as card base. Use Brown brilliance ink pad to stamp swirls onto Penny black writing paper and use Black Brilliance ink pad to stamp word touring. Tear strip of foiled vellum and attach to writing paper and secure at back and then attach to cardfront. Use Brown brilliance ink pad to stamp car image onto cream cardstock and trim to size and go around edges with color box ink pad and attach to brown cardstock and then to cardfront as shown. Attach buttons and car and Alphabet letter.

Sunday, October 25, 2009

Romance


Thought I would share another Penny Black card today. Their stamps are just so adorable.
Materials: White cardstock, red cardstock, Penny black foiled swirl vellum, gold cardstock, Penny Black hedgehog stamp, black brilliance ink pad, romance word charm, rhinestones, watercolor pencils, Cuttlebug swirl folder
Method: Fold white cardstock to create top fold card. Attach square of gold cardstock to cardfront. Take a square of white cardstock and run through Big Shot using Cuttlebug swirl embossing folder and attach to cardfront. Tear a strip of foil vellum and attach to red cardstock and then attach to cardfront as shown. Use Black Brilliance to stamp image onto white cardstock and color in using watercolor pencils. Go around edges with gold pen and then attach to red cardstock and then to cardfront. Attach rhinestones and word charm.
Enjoy the rest of your Sunday.

Saturday, October 24, 2009

Using paint strips


Paint strips are great to use on cards and best of all they are free. Whenever I go past a hardware store or paint shop, I always grab a handful of strips.
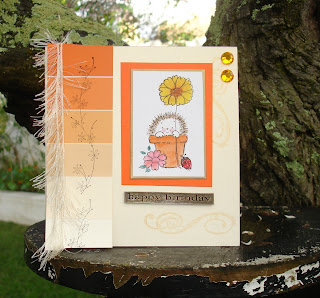
Today's card uses Penny Black stamps and some swirls from Autumn leaves.
Materials: Cream cardstock, orange cardstock, black brilliance ink pad, hedgehog stamp by Penny black, Floral border stamp Penny black, fibers, paint strip, rhinestones, Happy birthday word charm, gold paint pen, gold encore ink pad, autumn leaves swirl stamps, watercolor pencils.
Method: Fold cream cardstock to create side fold card. Use Black brilliance to stamp flowers onto paint strip and then wrap with fibers and attach to cardfront. Use gold encore ink pad to stamp swirls onto cardfront as shown. Use black brilliance ink pad to stamp hedgie onto cream cardstock and then go around edges with gold pen and attach to orange cardstock and then to cardfront.Color in with watercolor pencils and. Attach wordcharm and rhinestones.

Friday, October 23, 2009

Christmas Cute Companions Part 2


Now same materials as yesterday's card but just used different stamps from the Cute Companions range and it totally changes the card. Arn't they just so cute.

Thursday, October 22, 2009

Christmas Cute Companions


Thought I would share a Christmas card today. Crafters Companion in the UK sell a range of stamps and CD's called Cute Companions. All the little mice and bunnies have names and they are rather cute. They also have two DVD full of Christmas ideas using their stamps and CD's.
Today's card makes use of 3 of their stamps and also a backing paper scene decoupage sheet from one of their CD's.
Materials: Cute Companions Rubber Stamps, Black brilliance ink pad, tombow pens and watercolor pencils, clear glitter, snowwriter, Cute Companions Christmas Collection CD, black cardstock, foam pads, white cardstock.
Method: Fold black cardstock in half to create card base. Print out decoupage backing scene from CD and decoupage onto card. Using black brilliance, stamp the 2 mice and squirrel onto white cardstock and color in with watercolor pencils and tombow pens and then cut out and attach to cardfront as shown using foam pads. Use the snow writer to make snow on the branches under the window and ontop of the post box and add clear glitter.

Wednesday, October 21, 2009

Die cut handbags


A really super quick idea today. These very cute little handbags are a Sissix diecut. All I did was cut them out of scrapbook cardstock and then attached the flowers. I think they are too adorable and make for the quickest card ever.

Tuesday, October 20, 2009

Christmas card with honeycomb paper


Well thanks to Debbie for taking the photo of this card and adding to her blog. Decided to borrow her photo for this lesson.
Christmas is a wonderful time to make those special cards for friends and family and a pop out card is sure to wow them. Pop outs do take that bit extra time but they are so worth it.
Materials: White cardstock - 2 sheets, gold cardstock, white cardstock, white and gold organza ribbon, Christmas words stamp by PSX, Snowflake stamp by Hero arts, selection of Sissix and Cuttlebug embossing folders, big shot, sticky red tape, gold glitter, Cuttlebug snowflake die cut/embossing folder, small gold star embellishment, Clear embossing ink pad, Gold embossing powder, WS Designs Christmas tree pop out template, Gold Honeycomb paper.
Method: Take 1 sheet of white cardstock and fold in half to create square 15 x 15 card and set aside. Take square of gold cardstock 14 x 14 and attach to cardfront. Take square of white cardstock 13 x 13 and run through Big Shot using Sissix snowflake embossing folder. You will be left with strip down the right hand side of cardstock that has not embossed - onto this strip add red magic sticky tape and peel off liner and pour on gold glitter. Attach organza ribbon using vellum tape and secure to back of cardstock and then attach cardstock to cardfront as shown. Use Big shot to cut out snowflake from gold paper using Cuttlebug snowflake die cut and then emboss with the snowflake embossing folder and attach to cardfront as shown and add small gold star embellishment. The front of your card is now finished so you can set this aside.
Take your second sheet of white cardstock and again fold in half to create square 15 x 15 card. Take your ws designs christmas tree template and place up against the fold line and trace out your christmas tree and cut out. When tracing out the christmas tree mark the score lines on both sides of your card and score. Take the extreme right hand side of this card and run through the Big Shot using Cuttlebug Christmas words embossing folder. On the extreme left hand side, use clear embossing ink pad and gold embossing powder to stamp and emboss the snowflakes and christmas words.
Use your WS Designs tree template to cut out tree from gold honeycomb paper. Put lots of ds tape onto both sides of the tree and then using the inner piece of your card that you have just worked out as a guide, take off the tape on the one side of the christmas tree and lay it down on the inner part of your outer card. Once you are happy with positioning then remove tape from other side of the tree and close your outer card to secure the honeycomb tree.
Its now time to attach your inner card to your outer card. You only need to secure the right hand and left hand panels.
WS designs offer some wonderful templates and making pop out cards with their templates is so easy as they even have the notches in them as to where to score your card. They have both big and small templates in most designs and they also have a very good DVD all about pop out cards which is very good. They also sell honeycomb paper if you cannot find it in South Africa. I have bought it from them in the past and its pretty economical as you get about 16 christmas trees out of 1 sheet of honeycomb paper if you cut it carefully.
Hope you enjoyed this pop up technique.

Monday, October 19, 2009

On my broomstick


Well this card ends my Cute Daisy May Halloween series of 4 cards. Stand by for some more cards in a week or two using Cute Daisy May digital stamps - they are just so adorable I can't stop buying them.

Materials: Black cardstock, Orange Bazzil cardstock, Cream shimmer cardstock, Dot and star orange papers from Carol Ann Studio CD, orange ribbon, clippola, rhinestones, Copic Markers, Stickles gold glitter glue, orange color box ink pad, Image by Cute Daisy May, Cuttlebug Swiss dots embossing folder.

Method: Fold black cardstock to create square top fold card. Attach orange and then black cardstock. Print out star and dot paper from CD onto normal photocopy paper and trim to size and go around edges with orange color box ink pad. Take strip of black cardstock and run through Big Shot using Swiss dots cuttlebug folder and attach to cardfront. Print out digi image onto cream shimmer cardstock and trim to size. Go around edges with orange color box ink pad and colour in using Copic markers and highlight areas with Stickles glitter glue. Attach to black and then orange cardstock and then to cardfront. Add rhinestones and clippola with ribbon.

Sunday, October 18, 2009

Witchy Halloween


Isn't she just adorable - another image from Cute Daisy May in my series of 4 Halloween cards.
Where I live in Edgemead the kids come knocking on the door still saying Trick or Treat. I think I am going to dress up this year as a scary witch.That and I am on the lookout for a doorbell sound that sounds like cackling witches etc. Might as well scare the neighbourhood kids a bit.
Materials: Black cardstock, Orange bazzil cardstock, cream cardstock for digital image, orange star paper and orange halloween paper from Carol Ann studio cd, digital image by Cute Daisy May, copic markers, Gold Stickles, rhinestones, Halloween pumpkins cuttlebug folder, spider.
Method: Fold black cardstock to create square 15 x 15cm card. Go around edges of orange cardstock with orange color box ink pad and attach to cardfront. Attach black square of card and then print out orange star and halloween saying papers from CD and go around edges with color box ink pad and attach to cardfront. Print out digital image from Cute Daisy May and color in using Copic markers and highlight areas with Stickles glitter glue and then go around edges with color box ink pad and attach to black and then orange cardstock. Emboss strip of black cardstock with Cuttlebug pumpkins folder and attach to cardfront and then attach digital image. Attach rhinestones and spider.

Saturday, October 17, 2009

Sitting on my pumpkin

Getting into the spirit of Halloween here's another saying

It's Halloween! It's Halloween! The moon is full and bright/ And we shall see what can't be seen On any other night. Skeletons and ghosts and ghouls, Grinning goblins fighting duels/ Werewolves rising from their tombs, Witches on their magic brooms/ In masks and gown we haunt the street /And knock on doors for trick or treat/ Tonight we are the king and queen, For oh tonight it's Halloween!

Another halloween card today again using a Digital image from Cute Daisy May.

Materials: Black cardstock, Orange bazzil cardstock, cream cardstock to print digital image onto, orange star paper and dot paper from Carol Ann Studio CD, black and white spot ribbon, clippola, rhinestones, gold spider, orange color box ink pad, Copic markers, Gold Stickles glitter glue

Method: Fold black cardstock to form square 15 x 15 card. Go around edges of orange cardstock with orange color box ink pad and attach to cardfront. Then attach square of black. Print out star paper and dot paper from CD and go around edges with orange color box ink pad and attach to cardfront. Emboss a strip of black cardstock using Cuttlebug Swissdots embossing folder with Big Shot and attach to cardfront. Print out image from Cute Daisy May digital download and trim to size and go around the edges with a orange color box ink pad. Color in using Copic markers and highlight areas with gold stickles and attach to black cardstock and then orange cardstock and then to cardfront. Attach clippola with dotted ribbon and rhinestones and spider.

Friday, October 16, 2009

Trick or treat


Trick or treat - smell my feet - give me something good to eat.............
Just love that saying. Today's card uses a Digital image from Cute Daisy May. She has the cutest images I have seen in a long time. I find them totally irristable and have bought about 60 sheets so far. They are really good value at 1.99 Pounds for 4 images. See http://countrycraftergooglemailcom.blogspot.com/. She had a free sheet up yesterday so be quick to grab it and try out digital stamping
There has been a lot of discussion on RSA group recently as to whether or not we should be allowed to use Digital images on swaps and I am a firm believer that we must move with the times and allow it. You get such gorgeous digital images and one of the beauties of Digital stamping is the storage aspect and the other biggie is the cost factor. I really would challenge any stamper I know, to tell me the difference on a card, between a stamped image that has been coloured in and a digital image that has been coloured in.
Materials: Black cardstock, Main girl image by Cute Daisy May, Orange bazzil cardstock, orange star pattern paper from Carol Ann Studio CD, orange color box ink pad, copic markers, trick or treat saying by MFT, clear embossing ink pad, gold embossing powder, rhinestones, gold spiders, Gold Stickles
Method: Fold black cardstock to create 15 x 15 square fold card. Go around edges of Orange cardstock with orange color box ink pad and attach to cardfront. Then attach square of black cardstock and then print out sheet of orange star paper from CD and cut to size and go around edges with orange color box ink pad and attach to cardfront. Use clear embossing ink pad to stamp words onto strip of black cardstock and emboss using gold embossing powder and attach to cardfront. Print out image from digital download - Cute Daisy May and trim to size and go around the edges with orange color box ink pad and color in using Copic markers and highlight bow and buckle on hat with Gold stickles. Attach to orange cardstock and then to cardfront as shown. Add spiders and rhinestones and you are set.

Thursday, October 15, 2009

Adirondack paint dabbers technique - ATC examples


Well today I am sharing a few ATC's that I made using the Adirondack paint dabber technique that I explained on Tuesday this week. It really is an addictive technique and so quick to do I have found myself making lots of papers ready for stamping onto.
Have fun and enjoy and tomorrow look out for some Halloween cards.

Wednesday, October 14, 2009

More on the Adirondack Dabber technique


Very short post today. Just thought I would share with you the tags I made using the Adirondack dabber technique that I talked about yesterday.

Do give it a go I am sure you will have fun playing around with the paints.

Tuesday, October 13, 2009

Adirondack Dauber Paint Technique


As promised herewith new paint technique for cards that I discovered when playing around with ideas for World card making day. This one's also especially for Hayley who asked me to put more items on blog on what to do with things.
Well I had a selection of Adirondack paint daubers lying in my draw and decided it was high time to use them. They come in 39 colors (to match the adirondack ink pads etc) plus metallic colors. They are basically acryllic paint but in a bottle container with a foam tip. I found them ideal for this technique in that you only get a little bit out at a time so no big blobs of paint and also I found that provided you do this technique with a LIGHT TOUCH then it dries almost immediately and you can stamp onto the paint. It makes for lovely vibrant backgrounds and for a really quick card. Also I found that I didn't really need any embellishments on the card as the were perfect as they were.
The paints blend beautifully as well I found and you only use a little for each card so very economical in the long run.
Materials: Selection of stamps, Black Brilliance ink pad, Adirondack paint daubers - selection of colors, black cardstock, white cardstock, gold cardstock, gold pen.
Technique: Take a piece of white cardstock and then take your first paint dauber and shake well and then tap the foam head onto white scratch paper LIGHTLY several times to get the paint running. Once the paint is appearing on your scratch paper then tap lightly onto your white cardstock and then smooch with the foam head. Smooch being a very technical term of course - I mean that you rub the foam head around in circular motion LIGHTLY. I did the same color in a couple of places on the white cardstock and then switched colors and continued as before. I used metallic colors ie gold in this case last to kind of pull/blend everything together. Once dry and it really only takes less than 5 minutes provided you had a light hand, then you can stamp directly onto the piece. I used a selection of butterfly stamps, swirls and words in this instance. Then I went around the edges with gold pen and mounted onto black and then gold cardstock and then onto square folded 16 x 16 square black card.
This technique is so easy and you get wonderful backgrounds to use.If you don't rub in a circular motion another technique is to just lightly rub the foam head across the cardstock so that you end up with lines of paint as it were - more on this tomorrow and more samples as well.
Hope you enjoyed this technique.

Monday, October 12, 2009

Sassy girl


Well hope everyone had a great weekend.

Today's card uses a Digital download stamp from Charmed cards and Crafts. I am really loving my digital stamps.

Materials: Black cardstock, red and black polka dot scrapbook paper, red flowers and rhinestones, Copic markers, Digital image from Charmed cards and crafts, Black brilliance ink pad, red color box ink pad, swirl stamp, metal word charm.


Method: Fold black cardstock to create square card and then go around edges of polka dot paper with red color box ink pad and attach to cardfront. Use black brilliance ink pad to stamp swirls in corners as shown. Run strip of black cardstock through Big Shot using Cuttlebug swirl embossing folder and attach to cardfront. Attach flowers and rhinestones and word charm. Print out shopper girl onto white cardstock (with these digital stamps you can resize them which is great) and color in using copic markers and go around edges with red color box ink pad and attach to cardfront. Have a great week.

Sunday, October 11, 2009

Me and my bear


Now I know I did say that this past week I was going to post images of new paint technique for backgrounds using Adirondack Paint daubers but unfortunately the pictures I took last weekend were not great so will do my best to take better pictures today and post during this next week. I did demo on this technique at WCD last Saturday and we had great fun with it.
So you know what is on my list of things to do - take lots of photos for blog.
Today's card uses an image by Sugar Nellie. Isn't she sweet with her teddy.
Materials: Cream cardstock, green bazzil cardstock, pink pattern Prima scrapbook paper, pink organza ribbon, believe metal word charm, pearls, flowers, stickles glitter glue, black brilliance ink pad, Nestabilities square,Copic pens, Pink color box ink pad, Image by Sugar Nellie.
Method: Fold cream cardstock to create square card. Go around edges of green cardstock and pink pattern scrapbook paper with pink color box ink pad and then wrap pink organza ribbon around scrapbook paper and attach both to cardfront. Use Big Shot and nestabilities square die to cut a square from Green bazzil cardstock and attach to cardfront. Use Black Brilliance ink pad to stamp image onto cream cardstock and color in with Copic markers and cut out and attach to cardfront as shown and then highlight wings with Stickles glitter glue. Attach pearls and flowers and word charm. Enjoy the rest of your Sunday.

Saturday, October 10, 2009

Wedding bells


Here comes the bride.........
Today's card uses an image that can be bought and downloaded from Pink Petticoat. I love their papers and their Lola Rose range of digital stamps.
Materials: White cardstock, Pink Bazzil cardstock, Prima Marketing scrapbook floral paper, Olive Green Bazzil cardstock, Stick on pearls, Pink Petticoat Lola Rose wedding image, Copic Pens, Stickles glitter glue, Pink Color box ink pad, Flower, Bride metal word charm.
Method: Fold white cardstock to create square card. Go around edges of pink cardstock with color box ink pad and do the same with scrapbook paper and attach both to cardfront. Take strip of pink cardstock and run through Big Shot using Cuttlebug embossing folder and attach to cardfront. Print out digital wedding image from Pink Petticoat download and color in using copic markers and highlight areas with stickles glitter glue. Go around edges with pink color box ink pad and then attach to Olive cardstock and then to cardfront. Attach flower and word charm and then attach pearls. Enjoy the rest of your weekend.

Friday, October 9, 2009

Oh so cute


Couldn't resist sharing yet another Flower Child with you - how cute is she.
Materials: Cream cardstock, Turquoise bazzil cardstock, blue pattern scrapbook paper, laugh metal word charm, Friends gaffer tape, Prima flowers, buttons, stickles glitter glue, Black Brilliance ink pad, Aqua color box ink pad, Copic pens, Image by Stampotique.
Method: Fold cream cardstock to create square card. Go around edges of turquoise cardstock with aqua color box ink pad and attach to cardfront. Wrap gaffer tape (7 Gypsies) around scrapbook paper and go around edges with color box ink pad and attach to cardfront. Stamp flower child image onto cream cardstock and color in with copic markers and highlight areas with Stickles glitter glue and then trim to size and go around edges with color box ink pad and attach to cardfront. Attach flowers and buttons and word charm.

Thursday, October 8, 2009

Flower Child - Wish


Thought I would share another of the Flower Children cards with you - they are such great stamps and just love the images. Love the fact that their shoes are just too big for them.
Materials: Black cardstock, Mauve Bazzil cardstock, Mauve pattern scrapbook paper, Green Bazzil cardstock, Pink Bazzil cardstock, cream cardstock, Stamp by Stampotique, Wish word charm, Flowers and flower rhinestone, Stickles glitter glue, Copic pens, Black Brilliance ink pad, Pink color box ink pad.
Method: Fold black cardstock to create 15 x 15 square card. Cut Mauve cardstock to 14 x 14 and go around edges with pink color box ink pad and attach to cardfront. Cut scrapbook paper to 13 x 13 and again go around edges with color box ink pad and attach to cardfront and then attach strip of pink cardstock. Using black brilliance ink pad, stamp flower child image and heat set and trim to size and go around edges with color box ink pad and then color in using copic markers and highlight areas with stickles glitter glue. Attach to Olive green cardstock and then to cardfront. Attach flowers with rhinestone and word charm.

Wednesday, October 7, 2009

Sisters and Chocolate


Chocolate - what can a girl say but yum yum.I have an older sister called Linda who lives in Vancouver in Canada. I really wish she lived closer as I really miss her.

Today's card uses images from one of my favourite companies - MFT - My favourite things. I love their stamps.

Materials: Black cardstock, Lime green Bazzil cardstock, Bright Pink Bazzil cardstock, white cardstock, clippola, black and white dot ribbon, lime green rhinestones, tombow pens, Main image and writing and chocolates by MFT, swirl stamp by Autumn leaves, Black Brilliance ink pad, tombow pens, Lime green and pink color box ink pads.

Method: Fold black cardstock to create 15 x 15 square card. Go around edges of Lime green paper with pink color box ink pad and attach to cardfront. Use black Brilliance ink pad to stamp swirls as shown. On a piece of white cardstock stamp main image and go around edges with lime green color box ink pad and then color in with tombow pens and attach to bright pink cardstock and then to cardfront. Using black brilliance ink pad again, stamp words and chocolates on a strip of lime green cardstock and attach to strip of black cardstock and then to cardfront as shown. Attach clippola and ribbon and rhinestones.

Tuesday, October 6, 2009

Simple Floral card


I had these large flowers which I wasn't sure what to do with as they are rather large for using on a card if you have an image as well. Then I came up with this really quick and simple card to use them - a real 5 minute card.
Materials: black cardstock, red flowers, gold brad, Happy birthday words done on dymo, Word scrapbook paper, red color box ink pad
Method: Fold black cardstock to create 16 x 16 square fold card. Go around edges of word scrapbook paper with red color box ink pad and attach to cardfront. Use Dymo machine to spell out Happy Birthday and attach to cardfront. Glue on flowers and brad and you are done. Sometimes simple is very effective.

Monday, October 5, 2009

Sweet Pea


Happy Monday everyone and may we all have a fabulous new week. Today's card uses an adorable little girl image - she's called Sweet Pea from Paperbag studios - I could just eat her up she is so cute.

Materials: Black cardstock, Pink pattern scrapbook paper, Pink organza ribbon, pink buttons, black brilliance ink pad, Prima Flower, Hero arts writing stamp, Swirl stamps by Inkadinkadoo, Girlie Girl stamp, Sweet Pea girl stamp by Paperbag studios, black scrap of cardstock, cream cardstock, black brilliance ink pad, pink color box ink pad, silver glitter, quickie glue pen

Method: Fold black cardstock in half to create base card. Go around edges of pink scrapbook paper with pink color box ink pad. Using black brilliance ink pad stamp writing and swirls onto pink scrapbook paper as shown. Use glue pen to fill in areas of swirl flower image and then pour on silver glitter. Run organza ribbon around paper and attach to cardfront. On cream cardstock stamp Sweet Pea girl using black brilliance ink pad and mount her onto black cardstock and then onto cardfront. Attach buttons and flower.

Sunday, October 4, 2009

Glamour


Well another week gone. Thought I would share this rather girly card today -love the color combination of pink and brown together.
Materials: Cream cardstock, pink and brown dot and pink and brown swirl pink petticoat papers, strip of pink cardstock, cream cardstock for stamped image, brown and white dot organza ribbon, clippola, rhinestones, Glamour word charm, Chalks, Bodice image, Pink color box ink pad, Black Brilliance ink pad, flowers and jewel brad.
Method: Fold cream cardstock in half to create base card. Print out pink and brown dot paper and pink and brown swirl papers from computer download and go around edges with pink color box ink pad and attach to cardfront. Attach strip of pink bazzil cardstock. On cream cardstock stamp image using black brilliance ink pad and heat set and then go around edges with pink color box ink pad and color image with chalks and attach to cardfront as shown. Attach flowers with jewel brad, word charm and rhinestones and clippola with ribbon.
Enjoy what's left of the weekend.

Saturday, October 3, 2009

Happy cardmaking Day


Happy Cardmaking day to everyone. I do hope that you have plans to celebrate. I am going to be celebrating at Debbie's house - a group of about 10 of us. I will be doing two demos - One on honeycomb paper pop out cards and one using Adirondack paint dabbers. Hopefully will get pictures and will post these two techniques on my blog next week.
Today's card uses a Crafty Individuals stamp.
Materials: Black cardstock, Pink pattern scrapbook paper, Black and white Pink Petticoat download paper, Cream cardstock, selection of color box ink pads, Gold pen, Flowers, Rhinestones, Cuttlebug embossing folder, Black Brilliance ink pad,Distress stickles
Method: Fold black cardstock to create 16 x 16 square card. Run strip of black cardstock through Big Shot using Cuttlebug embossing folder.Go around edges of Pink pattern scrapbook paper with pink color box ink pad and then attach to cardfront and attach black/white pattern paper and then cuttlebug strip. Stamp image onto cream cardstock using black brilliance ink pad and heat set. Then use a selection of color box ink pads to color in using DTP technique as described in my blog entry on 26 Sep. Go around edges of image with gold pen and attach to cardfront. Rub distress stickles over Prima flowers using your finger as an applicator and attach flowers and rhinestones.

Friday, October 2, 2009

Laugh out Loud


Friday again and almost time for World Card Making day tomorrow. I am really looking forward to our celebrations at Debbie's house.
Today's card uses a favourite image from Paperbag Studios.
Materials: Laugh girl stamp by Paperbag studios, swirl stamps by Autumn Leaves, Always true stamp by Autumn Leaves, Brown brilliance ink pad, copper pen, black cardstock, gold cardstock, cream cardstock, orange pattern scrapbook paper, orange color box ink pad, organza ribbon, butterfly charms, flower and brad, selection of color box ink pads to color in image
Method: Fold black cardstock in half to create top fold square card. Go around edges of scrapbook paper with orange color box inkpad and then using brown brilliance ink pad stamp swirls and word onto paper and then wrap ribbon around and attach to cardfront. On a piece of cream cardstock stamp girl image using brown brilliance ink pad and heat set. Color in image using DTP technique with color box ink pads and then go around edges with copper pen and mount onto black and then gold cardstock and then to cardfront. Add butterflies and flower with brad.
Enjoy World Card Making day tomorrow.

Thursday, October 1, 2009

Eastern Mystery


A DL card just for a change today. I seem to make so many square cards.
Materials: Stampington chinese lady stamp, black cardstock, silver swirl paper, white cardstock, silver cardstock, silver pen,black brilliance ink pad, silver organza ribbon, dragonfly stamp, metal dragonfly, Silver encore ink pad
Method: Fold black cardstock in half to create DL card. Attach strip of torn silver pattern paper to cardfront as shown. Use Silver encore ink pad to stamp dragonfly repeatedly over the cardfront. Use Black brilliance ink pad to stamp woman's face and trim to size and go around edges with silver pen and then attach to black and then silver cardstock and attach to cardfront. Attach some organza ribbon and a metal dragonfly charm.